 |
 |
Table Of Contents
| Operating Instructions |
Welcome to the world of the MiniDisc! Here are some of the capabilities and features you'll discover with the new MiniDisc Recorder.
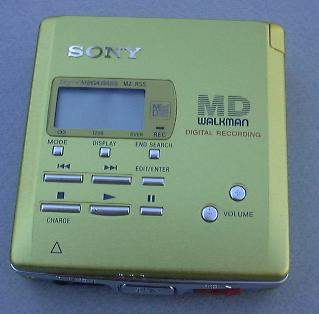
Looking at the controls

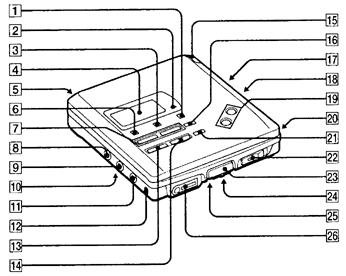
The recorder
| 1 | END SEARCH button |
| 2 | REC lamp |
| 3 | DISPLAY button -- Press to display the curent play mode, the remaining time of the current track, the remaining time of the disc, or the recording date and time. |
| 4 | Display window |
| 5 | DC IN 3V jack |
| 6 | MODE button -- Each time you press here while playing an MD, the recorder plays the MD in a different play mode: normal play, all repeat, single repeat, or shuffle repeat. Press here while recoring to select monaural recording. |
| 7 | |
| 8 | LINE IN (OPTICAL) jack |
| 9 | MIC (PLUG IN POWER) jack |
| 10 | MIC SENS (mic sensitivity) switch (at the bottom) |
| 11 | LINE OUT jack |
| 12 | DIGITAL MEGA BASS button -- Press to emphasize bass sound. |
| 13 | |
| 14 | |
| 15 | Battery Compartment |
| 16 | EDIT/ENTER button |
| 17 | AVLS (Automatic Volume Limiter System) switch (at the bottom) -- Slide to LIMIT to limit the maximum volume. |
| 18 | SYNCHRO REC (synchro-recording) switch |
| 19 | VOLUME +/- buttons |
| 20 | T MARK (track mark) button |
| 21 | |
| 22 | REC (record) switch |
| 23 | ERASE button |
| 24 | HOLD switch -- Slide to lock the controls of the recorder. |
| 25 | CLOCK SET button (at the bottom) |
| 26 |

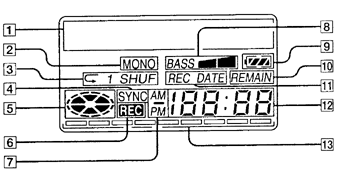
The display window of the recorder
| 1 | Character information display -- Displays the disc and track
name, date, error messages, track numbers, etc. * Disc and track names appear only with MDs that have been electronically labeled. |
| 2 | MONO (monaural) indication |
| 3 | Play mode indication -- Shows the play mode of the MD.
|
| 4 | SYNC (synchro-recording) indication -- Lights up while synchro-recording. |
| 5 | Disc indication -- Shows that the disc is rotating for recording, playing or editing an MD. |
| 6 | REC indication -- Lights up while recording. Flashes when standing by for recording. |
| 7 | AM/PM indication -- Lights up along with the time indication in the 12-hour system. |
| 8 | Mega bass indication |
| 9 | Battery indication -- Shows battery condition. While charging the rechargeable battery, this indicaiton shows the charging condition. |
| 10 | REMAIN (remaining time/tracks) indication -- Lights up along with the remaining time of the track, remaining time of the MD, or remaining number of tracks. |
| 11 | REC DATE (recorded/current date) indication |
| 12 | Time Display -- Shows the elapsed time of track being recodered or played. |
| 13 | Level meter -- Shows the level of the MD being played or recorded.Time display -- Shows the elapsed time of the track being recorded or played. |

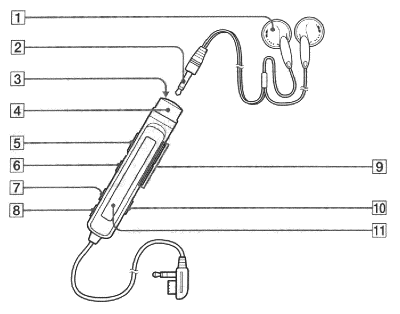
The headphones with a remote control
| 1 | Headphones -- Can be replaced with optional headphones. |
| 2 | Stereo mini plug |
| 3 | |
| 4 | Control -- To play, turn to |
| 5 | HOLD switch -- Slide to lock the controls of the remote control. |
| 6 | |
| 7 | PLAY MODE button |
| 8 | DISPLAY button |
| 9 | VOL (volume) +/- buttons -- When the AVLS switch is set on, you cannot increase the volume to the maximum. To increase the volume above the limited level, set teh AVLS switch to off. |
| 10 | TRACK MARK button |
| 11 | Display window |
| MD recording |
Recording an MD right away!
| 1 | Make connections.
When the recorder has different sound sources connected at the same time, the recorder switches to the digital, microphone, or analog input in this order of priority. |
| 2 | Insert a recordable MD.
|
| 3 | Select recording start point. If you want to add a recording to the end of the previous recording, press END SEARCH button. (If you want to start recording from the beginnin, skip this step.) |
| 4 | Start recording.
|
To stop recording, press ![]() . Do not move or jog the recorder or disconnect the power source while the
"Data Save" or "Toc Edit" indication is flashing in the display.
. Do not move or jog the recorder or disconnect the power source while the
"Data Save" or "Toc Edit" indication is flashing in the display.
| To | Press |
| Pause | |
| Record over partway through the previous recording | |
| Remove the MD |
(1)
A new track mark is added at the point where you pressed , and the recording will be marked with the new track number when you resume recording.If the recording does not start
Make sure the MD is not record-protected. If the tab at the side of the MD is open, slide
it back so the tab is visible.
Note
If the power supply is disrupted (i.e. the battery is removed or becomes exhasuted or A.C
power adaptor is disconnected) when the recorder is operating,the lid will not open until
the power is resotored.
| MD playing |
Playing an MD right away!
If you want to use the rechargeable battery, be sure to recharge them before playing.
| 1 | Make connections.
|
| 2 | Insert an MD.
|
| 3 | Start playing.
|
To stop play, press ![]() .
.
| To | Do this (Beeps in the headphones) |
| Pause | Press |
| Find the beginning of the current track | Press Turn the control to |
| Find the beginning of the next track | Press Turn the control to |
| Go backwards while playing(1) | Keep pressing Keep the control turned to |
| Go forward while playing(1) | Keep pressing Keep the control turned to |
| Remove the MD |
(1)
To go backwards or forward quickly without listening, pressIf the playback does not start
Make sure the recorder is not locked. If it is locked, slide the HOLD switch in the
opposite direction of the arrow.
When using optional headphones
Use headphones with a stereo mini-plug. You cannot use headphones with a micro-plug.
Notes
| Various ways of recording |
Connecting digital and analog inputs
The recorder selects digital or analog input according to how the sound source is
hooked up.
Input Difference |
Digital input |
Analog (line) input |
| Connectable source | Equipment with an optical digital output jack | Equipment with an analog (line) output jack |
| Usable cord | Digital cable (with an optical or an optical mini-plug) | Line cable (with 2 phono plugs or a stereo mini-plug) |
| Signal from the source | Digital | Analog Even when a digital source (such as a CD) is connected, the signal sent to the recorder is analog. |
| Recorded track numbers | Marked (copied) automatically... ...at the same positions as the source. ...when recording is paused. |
Marked... ...after more than 2 seconds of silence. ...when recording is paused. You can erase unnecessary markes after recording. |
| Recorded sound level | Same as the source | Adjusted automatically. You can also adjust it manually. |
Recording with digital input
(optical cable required)
Use an optical cable (POC-5B or POC-5AB, not supplied) to hook up a digital source such
as a CD or DAT. The source sound will be sent and recorded as a digital signal.
| 1 | Connect the LINE IN (OPTICAL) jack of the recorder to the optical digital
output jack of the source with an optical cable (not supplied). The recorder switches to digital input automatically. |
| 2 | Connect the power source. To use on AC power, see "Recording an MD right away!" To use on other power sources, see "Power sources". |
| 3 | Insert a recordable MD. Slide the OPEN switch to open the lid, insert a recordable MD, and close the lid. |
| 4 | Press and slide the REC switch to the right. "REC" lights up and recording starts. |
| 5 | Play the sound source. |
To stop recording, press ![]() .
.
Synchro-recording from a digital source
You can easily dub a digital source on an MD by using the SYNCHRO REC switch. Before
synchro-recording, be sure to make digital connection and insert a recordable MD.
| 1 | Slide the SYNCHRO REC switch to ON. "SYNC" lights up in the display. |
| 2 | Press and slide the REC switch to the right. "REC" lights up in the display. The recorder starts recording when you start playing the source player. |
To stop recording, press ![]() .
.
Tips
-You cannot pause recording manually during synchro-recording.
-When there is no sound from the source player for more than 3 seconds during
synchro-recording, the recorder stands by for recording automatically. When the sound
comes from the source player, the recorder starts synchro-recording again. When the MD
player is in recording pause for longer than 5 minutes, reocrding stops automatically.
Note
Do not switch SYNCHRO REC after step 2. Recording may not be made properly.
Recording from a microphone
Connect a microphone to the MIC (PLUG IN POWER) jack. Use a stereo microphone (ECM-717,
ECM-MS097, ECM-MS957, etc., not supplied).
| 1 | Select the sensitivity with the MIC SENS switch. Usually, set it to HIGH. When recording loud sounds such as a live concert, set it to LOW. |
| 2 | Insert a recordable MD. Slide the OPEN switch to open the lid, insert a recordable MD, and close the lid. |
| 3 | Press and slide the REC switch to the right. "REC" lights up and recording starts. |
To stop recording, press ![]() .
.
Recording in monaural for double the normal recording time of an MD
Before recording, make connections tot he sound source and the power source, and insert
a recordable MD.
| 1 | While pressing The recorder stands by for recording. |
| 2 | Press the MODE button. "Mono REC" appears in the display, and the recorder switches to monaural recording. |
| 3 | Press |
| 4 | Start the sound source. |
Tips
-The recorder switches back to stereo recording when you press ![]() to stop recording.
to stop recording.
-If you record in monaural from a stereo source, the sounds from left and right will be
mixed.
-The MDs recorded in monaural can be played back only with an MD player/recorder that has
the monaural playing function.
Adjusting the recording level (Manual recording)
When you record with an analog (line) input, the sound level is adjusted automatically.
If necessary, you can set the level manually.
| 1 | While holding down "ManualREC" appears, and the recorder stands by for recording. |
| 2 | Play the source. |
| 3 | While observing the level meter in the display, adjust the recording level by
pressing Set the level so that it hits the seventh indicator from the bottom at maximum input level. |
| 4 | Press |
Tips
-The recorder switches back to automatic level adjustment when you press ![]() to stop recording.
to stop recording.
-The recording level should be adjusted while the recorder is in standby mode. You cannot
adjust it while recording.
Setting the clock to stamp the recorded time
To stamp the date and time on the MD when you record, you need to set the clock.
| 1 | Connect the supplied AC power adaptor. |
| 2 | Press CLOCK SET button at the bottom of the recorder with a pointed object. The digits of the year flash. |
| 3 | Change the current year by pressing To change the digits rapidly, keep pressing |
| 4 | Press The digit of the month flashes. |
| 5 | Repeat steps 3 and 4 to enter the current month, date, hour, and minute. When you press |
If you make a mistake while setting the clock
Press ![]() , and repeat
the steps above.
, and repeat
the steps above.
Press ![]() to locate the
digit to be changed.
to locate the
digit to be changed.
To display the time in the 24-hour system
Press DISPLAY button while setting the clock. To change the clock to the 12-hour system,
press DISPLAY again.
Charging the built-in battery for the clock
After setting the clock, leave the recorder connected to the AC power for about 2 hours to
charge the built-in battery for the clock. Once charged, the built-in battery will last
for about a month without being connected to any of the power sources. The recorder will
automatically charge the built-in battery while operating on AC power, a rechargeable
battery or dry batteries.
| Various ways of playback |
Playing tracks repeatedly
Press MODE (PLAY MODE on the remote control) while the recorder is playing an MD.
Each time you press MODE (PLAY MODE on the remote control), the play mode indication
changes as follows:
| pressed once... |
| (none) (normal play) All the tracks are played once. |
| pressed again... |
| " All the tracks are played repeatedly. |
| pressed again... |
| " A single track is played repeatedly. |
| pressed again... |
| " All the tracks are played prepeatedly in random order. |
Connecting to a stereo system
Connect the LINE OUT jack of the recorder to the line in jacks of an amplifier or a
tape player with a line cable (not supplied). The output is analog. The recorder plays the
MD digitally and sends analog signals to the connected equipment.
| Editing Recorded Tracks |
You can edit your recordings. Premastered MDs cannot be edited.
Notes
-When you press ![]() after editing, "Toc Edit" flashes for about a second. Do not move or jog the
recorder or disconnect the power source while the indication is flashing.
after editing, "Toc Edit" flashes for about a second. Do not move or jog the
recorder or disconnect the power source while the indication is flashing.
-You cannot edit on an MD with its tab open for protection. Before editing, close the tab
at the side of the MD.
Erasing a track
You can quickly erase a recorded track. Note that once a recording has been erased, you
cannot retrieve it.
| 1 | Press the EDIT/ENTER button while playing the track you want
to erase. " |
| 2 | Press |
| 3 | Press EDIT/ENTER again. "Erase Ok?" and "Push ENTER"
appear alternately in the display. To cancel erasing, press |
To erase a part of a track
Add track marks at the beginning and the end of the part you want to erase, then erase the
part.
Erasing a whole disc
You can erase all the tracks on a disc at a time. Note that once a recording has been
erased, you cannot retrieve it.
| 1 | Press EDIT/ENTER on the recoder |
| 2 | Press |
| 3 | Press EDIT/ENTER again. "All Erase?" and "Push ENTER" appears
alternately in the display. To cancel erasing, press |
| 4 | Press EDIT/ENTER again "TOC Edit" in the display and all the tracks will be
erased and all the tracks will be erased. When erasing is complete, "BLANK DISC" appears in the display. |
Adding a track mark
You can insert a track mark into a track.
| 1 | While the recorder is playing or pausing an MD, press T MARK button on
the recorder at the point you want to mark. "MARK ON" appears in the display, and the track mark is added. |
To add track marks while recording
Press T MARK button while recording (except while Synchro-recording).
Erasing a track mark
When you record with analog (line), input, unnecessary track marks may be recorded. You
can erase a track mark to combine the tracks before and after the track mark.
| 1 | While playing the track with the track mark you want to erase,
press |
| 2 | Find the track mark by pressing "00:00" flashes in the display. |
| 3 | Press the T MARK button to erase the mark. The track mark is erased and the two tracks are combined. The number of the newly combined track will be that of the first track and the succeeding tracks will be renumbered. |
Moving recorded tracks
You can change the order of the recorded tracks.
On the recoder
| 1 | Press EDIT/ENTER while playing the track you want to move. " |
| 2 | Press |
| 3 | Press the EDIT/ENTER button again. |
| 4 | Press To cancel erasing, press |
| 5 | Press EDIT/ENTER again. The track moves to the selected destination track. |
On the remote control
| 1 | Press DISPLAY for 2 seconds or longer while playing the track you want to
move. " |
| 2 | Turn the control until " |
| 3 | Press |
| 4 | Turn the control to select the destination track number. |
| 5 | Press |
| Labeling Recordings |
You can label the MDs and tracks you recorded with letters, numbers, and marks. Each
label can be made up of up to 200 characters, and each MD can include up to 1700
characters.
Labelling a disc during stop
| 1 | Insert a disc To label a disc, that is already in the recorder Press |
| 2 | Press EDIT/ENTER . " |
| 3 | Press EDIT/ENTER again. |
| 4 | .Press Press Press Press MODE to delete a letter and move back all following letters to the left. Press |
| 5 | Repeat step 4 and enter all characters of the label name. |
| 6 | Press the EDIT/ENTER The track or disc is labelled. |
Labeling a track or a disc during recording
| 1 | Press EDIT/ENTER during recording " |
| 2 | To label a disc, press then press EDIT/ENTER. |
| 3 | Follow steps 4 to 6 of " Labeling a disc during stop " above.. |
Labeling on the remote control
| 1 | Insert a disc To label a disc, that is already in the recorder Press |
| 2 | Press DISPLAY for 2 seconds or longer until " |
| 3 | Press |
| 4 | Turn the control to select a letter and press The selected letter stops flashing and the cursor moves to the next input position. Press Press VOLUME +/- to move the cursor to left or right. Turn to the control to next one. Turn to Press DISPLAY to insert a blank space to type in a new letter. Press PLAY MODE to delete a letter and move back all following letters to the left. Press TRACK MARK to cancel labeling. |
| 5 | Repeat step 4 and enter all characters of the label name. |
| 6 | Keep pressing The track or disc is labeled. |
Labeling a track during playback
| 1 | Insert a disc and play the track you want to label |
| 2 | Press DISPLAY for 2 seconds or longer. " |
| 3 | Press The disc is ready to be labeled. |
| 4 | Follow steps 4 to 6 of " Labeling a disc during the stop
" above, enter the selected character. |
Labeling a track a disc during recording
| 1 | Press DISPLAY for 2 seconds or longer. " |
| 2 | To label a track, Press To label a disc, turn the control to |
| 3 | Follow steps 4 to 6 of " Labeling a disc during stop " above. |
To cancel labeling, Press ![]() .
.
| Power sources |
You can use the recorder on...
-house current.
-a nickel metal hyride rechargeable batter (supplied).
-dry batteries (not supplied).
It is preferable to use the recorder on house current when recording for a long time.
Using on a nickel metal hyride rechargeable battery
Before using the supplied nickel metal hyride rechargeable battery for the first
time, you must charge it .
| 1 | Connect the supplied AC power adaptor. |
| 2 | Insert the NH-14WM to the recorder and close the lid. When charging is completed, battery indication disappears. A completely discharged battery takes about 3 hours to charge fully and about 2 hours to charge 80%. |
| 3 | Press "Charging" flashes, |
Tip
You can use the recorder while charging.
Using on dry batteries/nickel metal hydride rechargeable battery
Be sure rechargeable battery, is fully charged.
1. Insert the fully charged nickel metal hyride rechargeable battery with correct
polarity..
Using on dry batteries
Use the battery case.
1. Attach the supplied battery case.
2. Insert the dry batteries with correct polarity.
Battery life
| Batteries | Recording | Playback |
| NH-14WM nickel metal hydride rechargeable battery | Approx. 2.5 hours | Approx. 4 hours |
| R6 (size AA) Sony alkaline dry batteries LR6(SG) x 2 | Approx. 5 hours | Approx. 10 hours |
| NH-14WM + LR6(SG) x 2 |
Approx. 9.5 hours | Approx. 16 hours |
When to replace the batteries
When the dry batteries or rechargeable battery are weak, the battery indicator is
flashing, or "LOW BATT" appears in the display. Replace the dry batteries or
charge the rechargeable battery.
Notes on dry batteries
Incorrect battery usage may lead to leakage of battery fluid or bursting batteries. To
prevent such accidents, observe the following precautions:
-Insert the + and - polsed of the batteries correctly.
-Do not install new and used batteries or different kinds of batteries together.
-Do not try to recharge the batteries.
-When the recorder is not used for a long time, be sure to remove the batteries.
-If a battery leak should develop, carefully and thoroughly wipe away battery fluid from
the battery compartment before inserting new ones
-When replacing the dry batteries, replace both batteries with new ones.
-The recorder does operate properly: always use two dry batteries..
| Additional information |
Messages
If the recorder cannot carry out an operation, error messages may flash in the display
window as follows.
(1)
If you have recorded or erased many times on the same MD, the data of a single track may be scattered throughout the MD. When the data is scattered in groups of less than 12 seconds long, the recorder will not be able to combine the tracks.Editing
You pressed a key on the recorder while editing on the remote control,
or vice versa.