| SONY Parts No.
|
|---|
| + Screw Driver (DK-20) (for 1.4mm) | (7-721-050-09)
|
| + Driver 2.6mm | (7-700-749-03)
|
| Tweezers | (7-700-753-02)
|
| Round Nose Plier | (7-700-757-01)
|
| Cutter | (7-700-758-02)
|
| Driver (for Volume adjustment) | (7-721-052-07)
|
| + Bit (#1) (for Torque Driver)(M0.8 - 2.0) | (7-721-052-91)
|
| + Bit (#0) (for Torque Driver)(M1.6, 2.0) | (7-721-052-92)
|
| Soldering Iron (20W)
|
| Base Tip for Soldering iron (for FFC removal) | (3-702-088-01)
|
| Desoldering Metal Braid (Solder Wick)
|
| Power Supply DC+5V (min 2.0A)
|
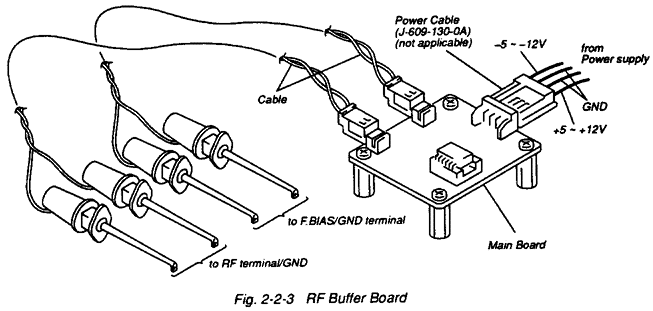
| Power Supply -5 ~ -12V (min 1.0A) (only when RF Buffer Board)
|
| BNC Cable (1.5m)
|
| Thermometer (Digital)
|
| Headphone (MDR-E741MP/K2) (for J1) | (8-953-537-94)
|
| Headphone (MDR-014MP) (for UC2, CEJ, CEK) | (8-953-009-90)
|
| Lip-12 Rechargeable Battery (Lithium-ion battery pack)
|
| SCSI Cable MOA-CIOT (for J1) (Bellows Type/50P-Full-50P-Half)
|
| AC Adapter (for J1) | (1-473-017-11)
|
| AC Adapter (for UC2) | (1-473-018-11)
|
| AC Adapter (for AE4, CEJ) | (1-473-019-11)
|
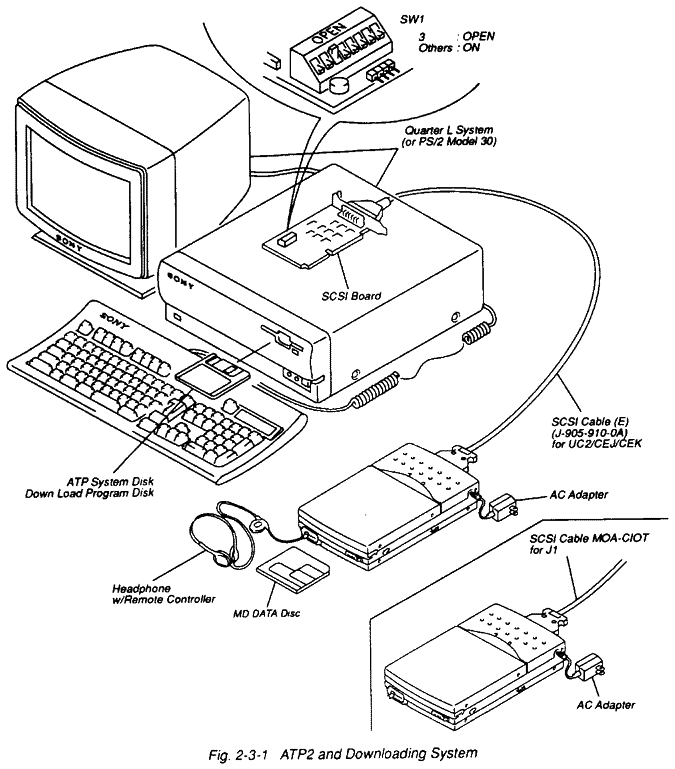
Quarter L (PCX-320 Series) system
Followings can be a substitute for the Quarter L system
PS/2 model 30
Dell Optiplex 4100
Note: Fujitsu SCSI card of PCMCIA Ver 2.0 could not be supported.
Note: Following specification are required.
640kbytes or more RAM
w/3.5" Floppy Disk Drive
w/Hard Disk Drive
DOS ver 5.1 or later
|
| SCSI Cable (E) (for UC2, CEJ, CEK pin type/50p Full-50p-Half) | (J-905-910-0A)
|
| Mech Deck Base | (J-905-914-0A)
|
| Over Write Head Height Tool | (J-905-913-0A)
|
| Power Cable (for RF Buffer Board) | (J-609-130-0A)
|
| BNC (one-end) Cable | (J-907-202-0A)
|
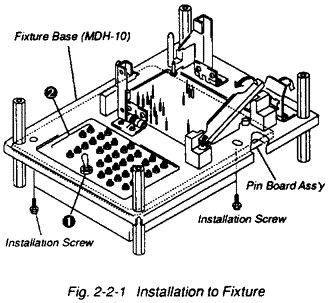
| Fixture Base (MDH-10) | (J-905-911-0A)
|
| Pin Board Ass'y | (J-905-912-0A)
|
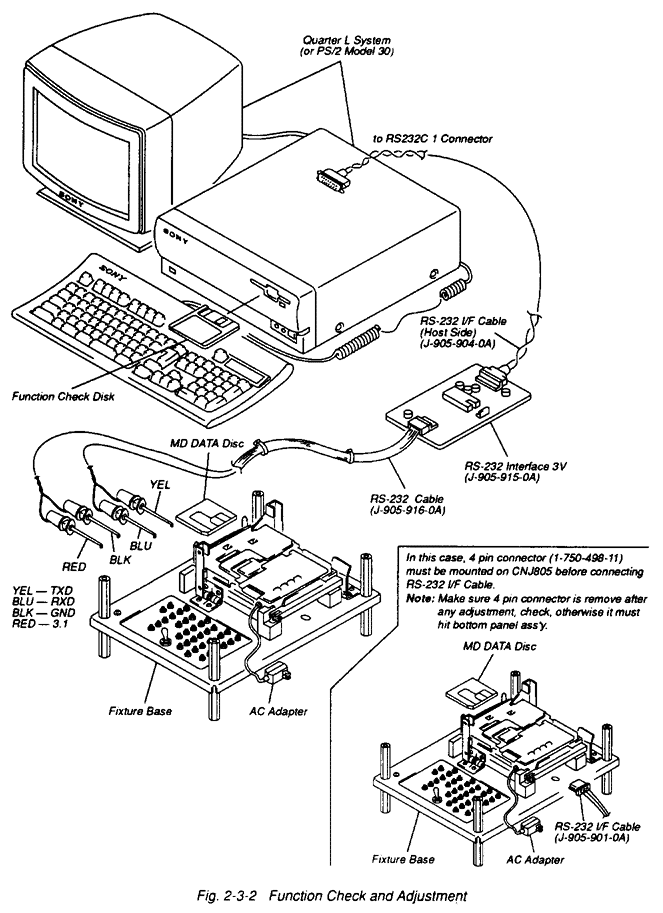
| RS-232 Cable | (J-905-016-0A)
|
| RS-232 I/F Cable | (J-905-901-0A)
|
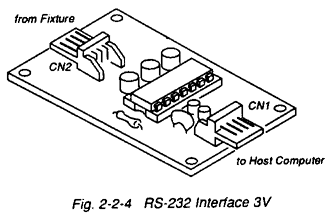
| RS-232 Interface 3V | (J-905-915-0A)
|
| RS-232 Cable (Host side) | (J-905-904-0A)
|
| Error Rate Counter | (J-905-902-0A)
|
| RF Buffer Board | (J-905-917-0A)
|
| MD DATA Power Checker (w/MD Cartridge) | (J-905-905-0A)
|
AC Adapter (recommend A08017 (AC 90V to 110V (Advantest))
or A08019 (AC 200V to 245V (Advantest))) (for MD DATA Power Checker)
Note: This checker consists of a Power Meter and a MD Cartridge.
And only MD Cartridge can be supplied for spare, as part No. J-905-906-0A.
|
| Line Out Cable | (J-905-919-0A)
|
|
| Acceptance Test Procedure (ATP) System disk (OR-D707WA) | (8-980-300-07)
|
This disk used for ATP. (for details, refer to
section 3)
|
| Function Check Disk (OR-D706WA) | (8-980-300-06)
|
This disk used for unit adjustment. (for details, refer to
section 5)
|
| Down Load Program Disk (OR-D702WA) | (8-980-300-02)
|
This disk used for down load program. (for details, refer to
section 5-10)
Note: Abovementioned disks can be worked on DOS V5.1 or later.
|
| Re-Writable Adjustment Disc No. 1 | (8-980-300-08)
|
| Test Disc (Read Only) (TGYS-9001) (OR-D716WA) | (8-980-300-24)
|
| Audio Test Disc (TGYS-1)
|
These discs (MD DATA) are used for unit adjustment and ATP.
|
|
| Oscilloscope (mini. 20MHz) (recommend Analog Type)
|
| Frequency Response Analyzer (recommend 5010A (NF Electric Instruments))
|
| Jitter Meter (recommend DB-3260 (KENWOOD))
|
| EF Phase difference Meter (recommend Phase Detector for MD (COPERU Co.))
|
| SCSI Board (The SCSI Master (ADAPTEC AHA1542/1522/1742))
|
| Pulse Jitter Counter (recommend TR5834/TR5835 (ADVANTEST))
|
| Digital Multi Meter
|
|
| Cleaning Liquid Lens | (J-250-100-0A)
|
| Cotton Swab (200pcs) | (7-740-900-65)
|
| Diamond Oil (NT-68) | (7-661-018-18)
|
| Sankol (FG-84M) | (7-662-001-36)
|
 FBIAS ... This switch is used for Focus Error offset (FE) adjustment.
(Set this switch to "Short" during FE adjustment, and set to "Open" during
FBIAS Adjustment.)
FBIAS ... This switch is used for Focus Error offset (FE) adjustment.
(Set this switch to "Short" during FE adjustment, and set to "Open" during
FBIAS Adjustment.) Test terminals
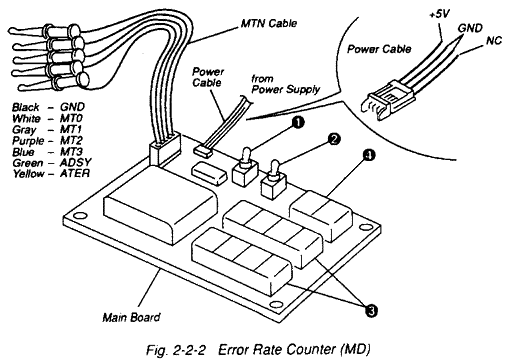 (1) Configuration (Refer to Fig. 2-2-2)
 C1/C2 Error (LED1 to 8) ... These indicate numbers of two types of
data errors; Random error and Burst error. The random error is an error of 1-2byte long which
appears all over the disc and the Burst error is a long error which locally appears in the disc.
C1/C2 Error (LED1 to 8) ... These indicate numbers of two types of
data errors; Random error and Burst error. The random error is an error of 1-2byte long which
appears all over the disc and the Burst error is a long error which locally appears in the disc. ATER (LED9 and 10)... The Rewritable Adj. Disc has address
(ADIP signals) which show the location of cluster/sector. This monitors ADIP signal Read
errors (ATER) every sector (98 frames) and indicates count No. of errors appeared in 75
sectors (7350 frames).
ATER (LED9 and 10)... The Rewritable Adj. Disc has address
(ADIP signals) which show the location of cluster/sector. This monitors ADIP signal Read
errors (ATER) every sector (98 frames) and indicates count No. of errors appeared in 75
sectors (7350 frames).