Minidisc Construction Project:
DIY square to miniplug TOSlink conversion
Sony portable MD recorders come with a joint analog/digital input. This
implies that if you wish to digitally record with your portable, you will need
an optical cable that ends with a 3.5mm miniplug. Sony, with its enlightened
accessories pricing policy, sells those babies at around $40. (Some mail order
companies sell their own version for much less, check the community pages for
references).
This page explains how to build such a cable at no cost and with very little
skills. These instructions will work for a R30, and I suppose they would also
work on a R3 or R50. Experiences on MS200 and ST701/2 are welcomed too.
Don't let yourself be scared by the size of the instructions. If you have
understood everything, it should not take more than 10 minutes to build your own plug.
With all discovering, testing and fine tuning, my plug took just an hour to make.
The nice thing about this method is that if you want to revert your cable to
square-square, there are no problems. Original parts are not messed.
I would like to thank members of the MD-list for giving me the idea of using an
inktube. If you're out there, let me know so that I can give credits to whom they're
due.
Have fun!
Denis ([email protected])
required spare parts
- One square to square TOSlink cable. This is the usual TOSlink cable that might
have been supplied with other digital equipement you own.
- One cheap out-of-ink ballpen (BIC or so)
- some adhesive tape
- scissors or a good knife
- A small flat screwdriver
instructions
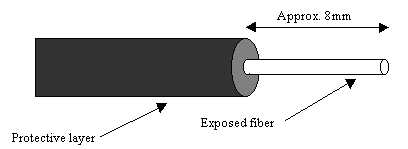
- With the small screwdriver, carefully lift the metal piece from the top of
one of the square connectors. Once this piece is off the connector, the fiber
should be loose from the connector.
- Take the fiber and connector apart by pulling gently. You should now have
about 8 or 9mm (or approx 5/16" for those of you metric impaired) of exposed
optical fiber on one end of the cable (see below).
- Take your ballpen apart, check that the inktube fits the analog input
diameter of your recorder by inserting it. The tighter the fit, the better. Don't
worry if you feel it is a bit loose. The protective layer of the
fiber should also fit tightly inside the tube. Friction should make
insertion a bit hard after 5 or 6mm. Note that you should make sure that the
tube is clear of leftover ink before you try to insert the fiber, this is why I
suggest using a clear see-through inktube. (if you believe
in green markers positively affecting digital signals, you might want to try an
old green ballpen tubing...)
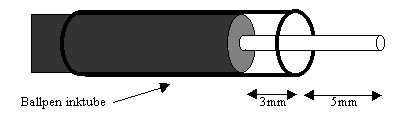
- Cut a piece of tube of a length of 20 to 25 mm (3/4" to 1"). be careful
not to cut yourself, I will not be liable in anyway if you do... It should be
just about the same length as a usual 3.5 mm headphone plug.
- The recorder will recognize if a digital input is used
when the plug activates switches inside the input. There seems to be three switches
corresponding to the three analog parts of a usual 3.5mm line plug. If the
first two switches are activated (but not the third) and a digital signal is
locked on from the fiber, the unit will automagically turn to digital recording.
You can easily feel the three different switches by inserting your inktube, you
should encounter three marked resistances.
- Insert the fiber into the tube. It should not get in too easily. You may want
to lubricate both parts with a bit of saliva. Be carefull not to damage the exposed
part of the fiber. To protect this part during operations, I use the spare square
connector backwards. If you use the same inktube as me (but I doubt there are
many differences between brands), you should be able to insert the end of the
square connector into the inktube, the square connector may serve as a relatively
more stable based to push onto.
- Insert the fiber until the exposed fiber sticks out of the inktube about
5 mm (3/16") as illustrated below.
- when you insert your plug into the input, you should feel the fiber resting
at the end of the input without the inktube engaging the third switch. The total
length of insertion should be about 1mm longer than usual 3.5mm plugs.
- Et voila, you may now test if the unit locks on a digital signal. As long
as digital does not
appear on the display, the unit does not recognize your plug and it needs a little
bit more of tuning (see below). Make sure that you have the other end of your cable
plugged to the digital output of a CD player or MD desk...
Fine Tuning
If the unit does not recognize your homemade plug, this might help:
- check that the third switch is not activated by your plug, if so, keep on inserting the
fiber just a little bit more in the inktube.
- if the inktube is too loose in the input, the switches will not get activated.
If it is the case, add a few layers of adhesive tape around your plug to make it
fit better.
It is also possible that the recorder recognizes the digital input, but loses the
lock in the course of recording. This happened to me a few times after about 20
to 25 minutes of continuous recording. It seems that the recorder's heat softens
the plastic of the inktube causing it to recess around the switches. It is easy
to feel this recess on your plug. When this happens, your unit keeps on recording
but switches to LINE input, and thus just records nothing. If you press stop,
the unit adds a new track with all non digital information, and you have a zero-length track at the moment when the digital signal was lost.
If this is the case, you should try to add more adhesive tape around your plug. My
plug is not easy to insert into the recorder and fits really tight. I've not had any
more problems of digital input loss. You could also
try to use another type of inktube that is less prone to deformation and more resistant to heat.
Back to the MD community pages
© Denis Dubuisson, 1998