|
Several
methods exist for copying music from your Minidisc recorder to MP3 files.
You have two main choices, which will be dictated by your sound card and
the facilities offered by your MD. If you have a new style sound card with
digital input, and have an MD which has digital ouput capabilities, it is
possible to copy from your MD recorder digitally which will usually give
you the best reproduction possible. If you don't have these facilities, you
will need to an analogue copy. This is not necessarily much worse than digital,
although the quality or the recording will be dictated by the quality of
the ADC (Analogue to Digital Converter) in your sound card. The only differences
between using a portable and a HiFi MD unit, are the cables you will use.
Analogue copying

|
|
|
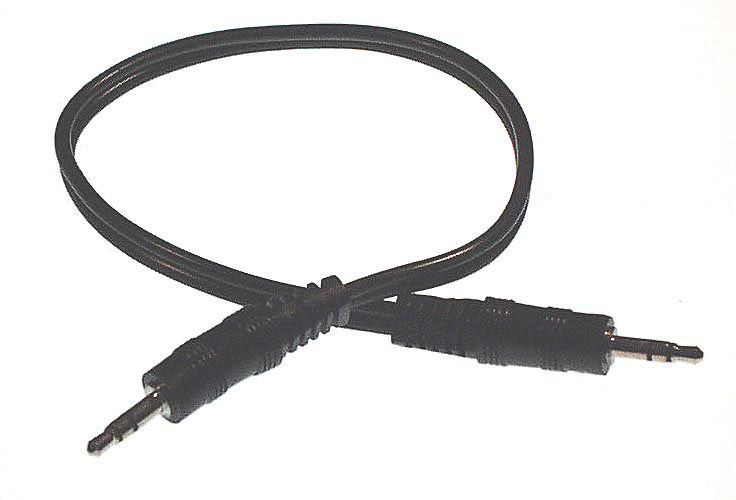
Analogue cable for portable MD units
|
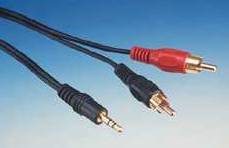
Analogue cable for HiFi MD units
|
The first thing you will need to do , is identify the Line In
socket on your sound card. This may not be labelled on the card itself, so
you may find you need to reach for the manual to find out which of the sockets
it is. You may find the socket is labelled Aux In instead. This is the same as a Line In socket and so can be used. You can not use the Mic in socket, as ths will result in damage to your sound card, and possibly also to the Minidisc player.
Once
you have located the Line In socket, you will need to plug one end of the
cable into the socket. The cable you use will depend on the unit you have.
Portable MDs usually come with a cable which has a 3.5mm jack at one end,
and 2xRCA connections at the other. You cannot use this cable to connect
to your sound card. Portable users need a cable with a 3.5mm stereo jack
socket at both ends of the cable, as shown in the picture above (left).
HiFi MD users should obtain a cable as shown in the picture above on the
right. Locate the Line Out socket on your MD, and insert the other
end of the cable into this socket. If you have a HiFi MD unit, you should
connect to the output connections on the rear of the unit, labelled either
"Play", "Line Out" or "To Amp" depending on the make of your MD. You may
now jump to the recording section.
Digital Copying
Please note thjat most portable units do not
have digital outputs, so this section will only apply to users of HiFi MD
units, or bery modern portables. There are two versions of digital connectors
on sound cards; Optical and Coax. Although the method of copying is the same, the way in which you connect the equipment isn't. Please choose either Optical or Coax depending on the connections on your sound card.
If
you are lucky enough to have an optical connection on your sound card, you
can plug your optical TosLink cable directly into it, and you are ready to
record. You may now jump to the recording section.
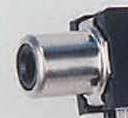
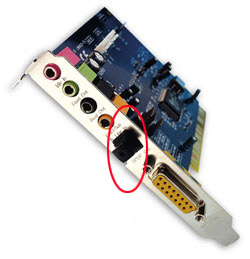
If
you have a socket on your sound card similar to the one in the picture above,
then you may need something to convert the signal into an optical format
that you can connect your TosLink cable too. Users of some HiFi units can
connect directly to this connection using a coax cable, but most users are
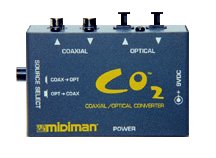
not so lucky. Several solutions exist to overcome this problem. The easiest
to use is a box that sits between your MD and the soundcard. One such unit
is the Midiman CO2 (picture below). Using this unit, you connect a coax cable
from the soundcard to the CO2, then connect your Toslink cable from the CO2
to the MD. There are currently no DIY options that will convert optical into
coax, only units that operate the other way around.
|
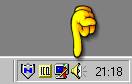 You
now need to tell your computer to accept input from the Line In socket. To
do this, load the mixer application by double clicking on the speaker at
the bottom right of your desktop. You
now need to tell your computer to accept input from the Line In socket. To
do this, load the mixer application by double clicking on the speaker at
the bottom right of your desktop.
|
|
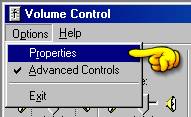 From the "Options" menu, choose "Properties". From the "Options" menu, choose "Properties".
|
|
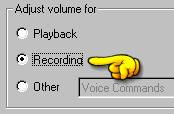 You now need to select the option to adjust settings for Recording, as shown in this picture. You now need to select the option to adjust settings for Recording, as shown in this picture.
|
|
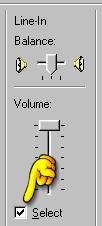 Now
ensure there is a tick next to the word Select for the Line In, as shown
in the picture. You will also need to make sure you have the input volume
slider somewhere between half way and full volume. The position of the slider
will depend on the volume of the disc you are recording and the amplification
on your sound card. You can also ensure that you get as little background
noise as possible by clearing ticks from other inputs such as CD Audio and
Microphone. Ensuring the Microphone input is not selected is the most important,
as this can generate a very large amount of hiss which is very noticable
in the end recording. Now
ensure there is a tick next to the word Select for the Line In, as shown
in the picture. You will also need to make sure you have the input volume
slider somewhere between half way and full volume. The position of the slider
will depend on the volume of the disc you are recording and the amplification
on your sound card. You can also ensure that you get as little background
noise as possible by clearing ticks from other inputs such as CD Audio and
Microphone. Ensuring the Microphone input is not selected is the most important,
as this can generate a very large amount of hiss which is very noticable
in the end recording.
|
|
You
should now find that any recording software you run will be able to record
the music you play on your Minidisc. The software you use will probably vary
considerably, and will probably be using software that varies from the software
I usually use. In the examples below, I have used Sound Forge 4.5 which is
very good for manipulating sound. The main requirements for recording sound
and ensuring a good quality recording, are that you should be able to see
the level at which the recording will be made. Sound Recorder does not
offer this facility, and is therefor almost useless for quality recording.
WaveStudio, which comes with Sound Blaster cards, is adequate for the job
as it provides a basic means of monitoring the sound volume before you start
recording. The reason as to why this is important will become clear in a
moment.
|
|
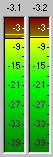 By
finding a loud passage in the music you wish to record, you can set the record
levels so that the music will be loud enough to be free of background noise,
yet not too loud so that it ends up distorting. Ideally, the peak of the
music should hit somwehere between -6 and -3 on the scale (shown in the picture)
so that any slightly louder passages will not cause distortion or clipping
(a cracking sound heard on playback). If the levels are too high, use the
mixer program to reduve the volume of the Line In input. If the volume is
to quiet, then slide the Line In volume up a bit more. By
finding a loud passage in the music you wish to record, you can set the record
levels so that the music will be loud enough to be free of background noise,
yet not too loud so that it ends up distorting. Ideally, the peak of the
music should hit somwehere between -6 and -3 on the scale (shown in the picture)
so that any slightly louder passages will not cause distortion or clipping
(a cracking sound heard on playback). If the levels are too high, use the
mixer program to reduve the volume of the Line In input. If the volume is
to quiet, then slide the Line In volume up a bit more.
|
|
You
can now stop playback and line the Minidisc up with the point at which you
wish to start recording. The best way to do this, is to put the unit in Pause
mode at the start of the track. When it is ready, click "Record" in your
sound recording sofware, and press start on your Minidisc. You can now sit
back and wait for the end of the music. When you reach the end of the music,
click "Stop" in your sound recording software, and stop the Minidisc. You
should now save your recorded file somewhere where it can easily be found.
I suggest saving it in the "My Documents" folder. You should really now listen
to the file you have recorded to make sure it has been recorded correctly.
If you hear cracking sounds in the playback, or it is distorted, you probably
had the record levels too high, in which case you need to turn them down
a bit and record the file again. Don't forget to delete the old file first,
otherwise you may find you run out of space on the hard disc. Typically,
a recording will take about 10Mb per minute, so a 5 minute song will need
50Mb free on your hard disc. Once you have recorded your music and you are
happy with the result, you are ready to turn the WAV file you have recorded
into an MP3.
|
|
 There is a wide range of software for turning WAV into MP3, and the software
you choose can have a big impact on the sound. Although the program I have
chosen to use is really designed to grab music from a CD to make MP3s with,
it has one of the best MP3 encoders available, and also has the ability to
encode WAV files as MP3, whic is what we are about to do. You can get a shareware
version of this program from many sites on the internet, or direct from the
Xing Technology Web Site.
There is a wide range of software for turning WAV into MP3, and the software
you choose can have a big impact on the sound. Although the program I have
chosen to use is really designed to grab music from a CD to make MP3s with,
it has one of the best MP3 encoders available, and also has the ability to
encode WAV files as MP3, whic is what we are about to do. You can get a shareware
version of this program from many sites on the internet, or direct from the
Xing Technology Web Site.
|
|
 In the program, you should click the Settings button, as shown in the picture. In the program, you should click the Settings button, as shown in the picture.
|
|
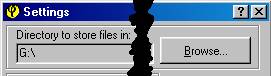 At
the top of the window that opens you will see the option to alter where encoded
files are saved to. On my system I have a drive (G:) that is just used for
MP3 files. Most people will want to set this to somewhere such as "My Documents".
The most important thing is to set it to somewhere obvious so that you will
be able to find the MP3s easily. Once you have chosen your location, click
OK at the bottom of the window. At
the top of the window that opens you will see the option to alter where encoded
files are saved to. On my system I have a drive (G:) that is just used for
MP3 files. Most people will want to set this to somewhere such as "My Documents".
The most important thing is to set it to somewhere obvious so that you will
be able to find the MP3s easily. Once you have chosen your location, click
OK at the bottom of the window.
|
|
 In the program, you should click the MP3 button, as shown in the picture. In the program, you should click the MP3 button, as shown in the picture.
|
|
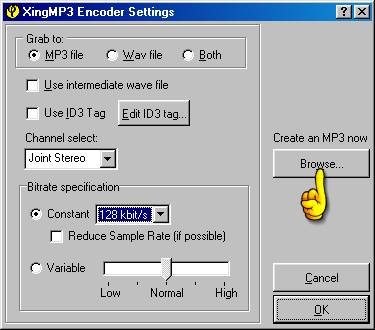 When
you click the MP3 button, the following window will appear. Check that the
options in your window match those in this one. Note that the blue box towards
the bottom of the window has 128kbit/s selected. This value may be changed
depending on what you want to do with the file. For listening on the computer
at home, or via a laptop, I recommend at least 192kbit/s. I usually use 256kbit/s
for my MP3 files. Using such high rates has a big disadvantage for sending
these files over the internet though, and that disadvantage is that the higher
the rate you choose for encoding, the bigger the file will be. Internet files
are usually either 128kbit/s or 160kbit/s because this offers a reasonable
trade-off between quality and size. Although you will get some squelching
or distorted sounds with instruments such as ride cymbals or wind instruments
at high pitch such as flutes or recorders, most music will encode very well
at this low rate. Now on with the show... click the button marked "Browse..."
as shown by the hand in the picture. The usual open file dialogue box will
appear, and you should find the file you just saved and open it. When
you click the MP3 button, the following window will appear. Check that the
options in your window match those in this one. Note that the blue box towards
the bottom of the window has 128kbit/s selected. This value may be changed
depending on what you want to do with the file. For listening on the computer
at home, or via a laptop, I recommend at least 192kbit/s. I usually use 256kbit/s
for my MP3 files. Using such high rates has a big disadvantage for sending
these files over the internet though, and that disadvantage is that the higher
the rate you choose for encoding, the bigger the file will be. Internet files
are usually either 128kbit/s or 160kbit/s because this offers a reasonable
trade-off between quality and size. Although you will get some squelching
or distorted sounds with instruments such as ride cymbals or wind instruments
at high pitch such as flutes or recorders, most music will encode very well
at this low rate. Now on with the show... click the button marked "Browse..."
as shown by the hand in the picture. The usual open file dialogue box will
appear, and you should find the file you just saved and open it.
|
|
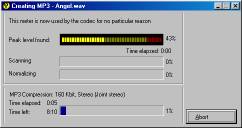 A
window like the one shown in the picture will appear and your file is now
being encoded into an MP3 file. Unfortunately, the downside of this program,
is that it does not offer you a location to save the MP3 in when you choose
the file. This is why we had to go into the settings dialogue and alter options.
When the program has finished encoding, the box will disappear, and your
MP3 file will be ready for use. A
window like the one shown in the picture will appear and your file is now
being encoded into an MP3 file. Unfortunately, the downside of this program,
is that it does not offer you a location to save the MP3 in when you choose
the file. This is why we had to go into the settings dialogue and alter options.
When the program has finished encoding, the box will disappear, and your
MP3 file will be ready for use.
|
|