SECTION 3
TROUBLESHOOTING

This section describes troubleshooting method. Section 3-2 and 3-4 described ATP (Acceptance Test Procedure) procedure. In your repair work, you can easily check how the drive is functioning and determine whether it is really faulty or not. If some error occurs during ATP, define the defective block (part) in accordance with Function Check and the procedure in section 3-3 and 3-5.

3-1 BEFORE TROUBLESHOOTING

The following procedure is recommended to verify if the unit is really faulty.
  1. Poor connection with the host system (esp. SCSI Cable, GND-related connection, frame GND, etc.)
  2. Incorrect operational procedure.
  3. Program error of host system.
  4. Wrong SCSI ID selection.
  5. Wrong supply voltage or power source is not connected.
  6. Environmental conditions. (where electrical noise easily jumps into signal.)
  7. Influence of strong magnetic field.
  8. Doubled I/O address setting on the SCSI boards.
  9. Dirty test disc.

3-2 PROCEDURE OF ATP TEST 1

3-2-1 Preparing

Note: Make sure Battery pack is 3V or less in accordance with section 5-3.

3-2-2 Test Procedure

Test ProcedureCheck point
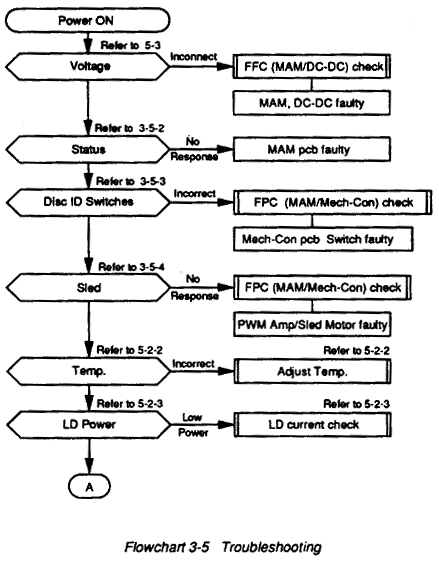
a. Power Circuit Check
    a-1. Set a battery pack into the unit under test. (No need to connect a AC adapter.)

    a-2. Set the switch on the unit as below.
      POWER/Mode Select: AUDIO
      Terminator/SCSI: don't care
      AVLS: OFF
Power LED (Orange) blinks.

    a-3. Set a AC Adapter into the unit.
Charging to the Battery automatically starts and the Power LED color switches with orange.

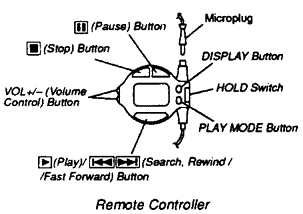
b. Command Check using a Remote Controller
    b-1. Connect the unit to a Headphone with a remote controller.
    b-2. Set the switch on the unit and a remote controller as below.
      Hold : off

    b-3. Insert a Audio Test Disc (TGYS-1) to the unit.
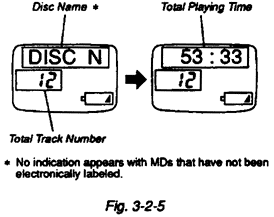
After a while, following indication (Disc Name, Total playing Time, Track No., Battery Condition) appears in the display window of the remote controller.
    Disc Name: MD AUDIO TEST 1
    Total Playing Time: 45 : 51
    Track No.: 99
    Battery Condition:

    b-4. Press the Play button on the remote controller.
The unit will start playback. The track No. and the elapsed time of the track will appear in the display window.

    b-5. Adjust the volume by pressing the + side or - side of VOL+/- button on the remote controller.

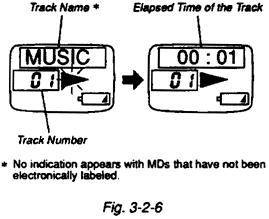
The volume will increase (decrease) on the display window.

    b-6. Set the AVLS switch to ON, and repeat item b-5.
The volume will not be more than half level of the volume indication, when pressing the + side of VOL+/- button.

    b-7. Keep pressing the fast forward key on the remote controller.

The unit quickly fast forward.

    b-8. Keep pressing the rewind key on the remote controller.

The unit quickly rewind.

    b-9. Press the fast forward key on the remote controller once.
The unit find the beginning of the next track and will start playback. And make sure two short beeps, and turn with next track no. on window display.

    b-10. Press the rewind key on the remote controller once.
The unit find the beginning of the current track and will start playback. And make sure three short beeps.

    b-11. Press the pause/release button on the remote controller once.
The unit is set in pause mode. And make sure continuous short beep.

    b-12. Press the pause/release button again.
The unit will release pause mode and will start playback again. And make sure beep stops.

    b-13. Press the stop button on the remote controller.
The unit will stop playback. And make sure one long beep.

c. Displaying disc and track names elapsed time during play back.
    c-1. Press the DISPLAY button during play back.
Each time, the indication changes as follows:

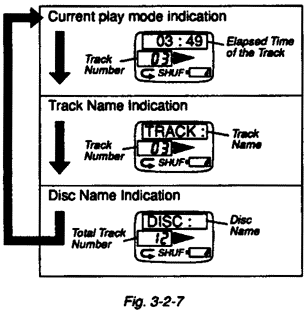
d. Repeated Playback
    d-1. Press the PLAY MODE button on the remote controller during play back.
Each time, the indication changes as follows:

    e-1. Eject the disc.
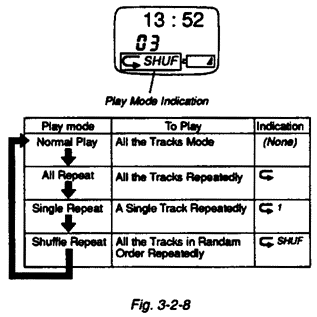
    e-2. Turn off the power and disconnect the unit.
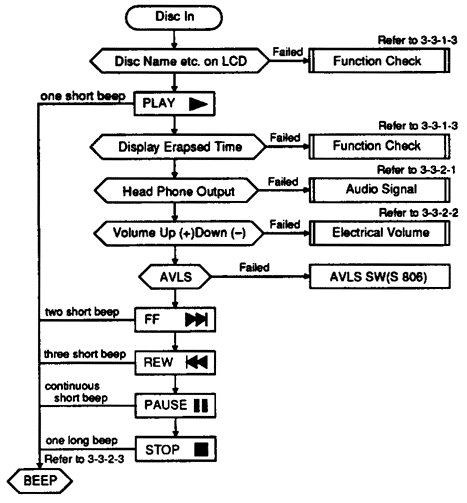
3-2-3 Check Point

Test ItemsCheck PointRemarks
Power Circuit1. FFC ConnectionCN801
2. Voltage OutputRefer to 5-3
3. Battery MonitorRefer to 3-3-1
Command Check
using a remote controller

Display

Repeated Playback
Drive function (IC705/IC707)Refer to 3-3-1-3
+B power3.5±0.1V (TP325) is obtained.
Audio OutputRefer to 3-3-2-1
electrical volume (IC314)Refer to 3-3-2-2
BeepRefer to 3-3-2-3
AVLS switchS806

3-3 AUDIO FUNCTION CHECK

The following flowchart shows an example of typical procedure to check a faulty drive and to identify defective part in the audio circuit.

3-3-1 Serial Control

3-3-1-1 Pre-setting

  1. Set the switches on the unit as below.
    Power / Mode Select: Data
    Others: don't care
  2. Connect the unit to the host computer through a serial port as shown in Fig 2-3-2
Note: After connecting the drive to be tested, load TEST program in accordance with section 5-1.

3-3-1-2 Battery Monitor

  1. Connect the AC Adapter, and put the LIP-12 Rechargeable Battery (discharged) to the unit.
  2. Put rffdc1 on cmd [x]> line. (Read A/D data of battery voltage.)
  3. The value should be less than 61 (hex).
Note: When it is in the specification, check the logical level of CHGC (TP8337) signal and POWER2 (TP8330) signal. If both of those signals are True, DC-DC converter unit is faulty. If the A/D data does not satisfy the specification, check DC-DC output voltage and battery monitor circuit.

3-3-1-3 Function Check

  1. Insert a Audio Test Disc (TGYS-1) to the unit.
  2. Execute the check procedure from 3-5-2 (Status Check) to 3-5-10 (Read TOC/UTOC).
Note: If no trouble can be found, IC705 (CXD1805AR) or IC707 (CXD2927R) is defective.

3-3-2 Audio Mode

3-3-2-1 Audio Signal

If the elapsed time goes on, but no sound can be heard from the head phone, check the audio signal by using the oscilloscope.
  1. Set oscilloscope as below.
    Display: CH1
    Range: 1V/div. DC 1ms/div.
    Trigger: Auto
  2. Set the Power/Mode SW to Audio.
  3. Connect the AC adapter to the unit.
  4. Insert a Audio Test Disc (TGYS-1) to the unit.
  5. Start playing track 1 (1kHz 0DB L&R) using the remote controller.
  6. Connect the probe to the test point as following sequence, and check the waveform (1kHz) shown in Display 5-7 appears on the oscilloscope.
    1. TP330 (R-ch) and TP329 (L-ch)
      If no signals, check J302 connection.
    2. TP344 (R-ch) and TP346 (L-ch)
      Check if the voltage of 3.1±0.1V DC. is obtained at AP336. If not, the headphone amp (IC310) is faulty.
    3. TP336 (R-ch) and TP338 (L-ch)
      Check if the voltage of 3.3±0.1V DC. is obtained at AP335. If not, the electrical volume (IC314), A/D converter (IC306), ATRAC (IC707 - CXD2927R) is faulty.

3-3-2-2 Electrical Volume

  1. Set oscilloscope as below.
    Display: CH1
    Range: 1V/div. DC 1ms/div
    Trigger: Auto
  2. Set the switches on the unit as below.
    Power / Mode Select: Audio
    AVLS: off
  3. Connect the AC adapter and insert a Audio Test Disc (TGYS-1) to the unit.
  4. Start playing track 1 (1kHz 0DB L&R) using the remote controller.
  5. Adjust the volume by pressing + side or - side of the VOL+/- button. And check if the waveform at TP330 (R-ch) and TP329 (L-ch) changes zero level to maximum level (1.6±0.3Vp-p) in accordance with the volume indicator.
Note: If it doesn't change, check the electrical volume (IC 314) and its control signals.

3-3-2-3 Beep

Beep sounds shown in the following table will be heard on the headphone when operating on the remote controller.
ToPressBeep
Play (one short beep)
pause/release pause (continuous short beep)
stop (one long beep)
rewind while listeningkeep pressing (none)
fast forward while listeningkeep pressing (none)
quickly rewind without listening (pause) and keep pressing (none)
quickly fast forward without listening (pause) and keep pressing (none)
find the beginning of the current trackpress once shortly (three short beeps)
find the beginning of the next trackpress once shortly (two short beeps)
If incorrect or no beep can be heard on the headphone, check the voltage of 3.5±0.1V DC. on +B line (TP325), or the key detection circuit is faulty.

3-4 PROCEDURE OF ATP TEST 2

3-4-1 Pre-Setting

  1. Connect a reference unit (brand-new) to the ATP System. (Refer to Fig. 2-3-1) If the defective drive is connected, this program may not boot up.
  2. Turn on the power (The mode SW is "DATA") of reference unit first (brand-new), then computer.
  3. After system loading, insert ATP System Disk (OR-D707WA) into Drive A.
  4. Change directory in drive A.
  5. Turn off the power of the Unit.
  6. Change the reference unit with one to be tested, and then turn on the power (The POWER/Mode Select is "DATA") again.
  7. Set some switches on the unit so that its setting is the same as factory shipping in accordance with table 6-1-2.
  8. Type ATPMD and Enter key. (After test program loading, Display 3-4-1(a) shows up.)
Note: If the SCSI ID is not set to ID 3, use "-I<id>" option with ATPMD.
ex.: ATPMD -I1
Display 3-4-1(a)
ATP for MD DATA (ver x.xx) (C) Copyright SONY Corp. 1994

INQUIRY
   Vendor   :    SONY
   Product  :    MDH-10
   Version  :    x.xx

Do you want to start ATP? ([Y]/N/Q)

3-4-2 Test Procedure

  1. Press Y to start ATP. (Display 3-4-1(b) or (c) shows up)
Note: In case of escape from ATP, press N key.
Note: If any disc is inserted in the drive, following message will Display 3-4-1(b) shows up. If not Display 3-4-1(c) shows up.
Display 3-4-1(b)
Please eject disc. (If it is inserted)

Display 3-4-1(c)
Please Insert Test Disc
  1. Insert Re-Writable Adj. Disc to the unit under test. And the result (OK or NG) of each test item on the Test Result column will appear as below.
Note: If any of error occurs during ATP, Display 3-4-1(e) shows up.
Display 3-4-1(d)
Read Capacity Test            XX
Disc Capacity xxxxx blocks  (xxxx bytes/block)
TOC read                      XX
UTOC read                     XX
Start/Stop.............
      :Start :xxxxmsec.
      :Stop  :xxxxmsec.
      :Error Start : x
      :Error Start : x
      .................       XX
Rezero                        XX
Seek...................
Average: 00000 --> xxxxx : xxxxmsec. xxxxx -> 00000 : xxxxmsec. Error = x
Average: xxxxx --> xxxxx : xxxxmsec. xxxxx -> xxxxx : xxxxmsec. Error = x
Average: 00000 --> xxxxx : xxxxmsec. xxxxx -> 00000 : xxxxmsec. Error = x
       ................       XX
Read...................
Average: xxxxmsec.            XX
Write..................
Average: xxxxmsec.            XX

Display 3-4-1(e)
Continue ? ([Y]/N)
  1. If the test using Re-Writeable Adj. Disc is completed, then Display 3-4-1(f) shows up. Eject the Re-Writable Adj. Disc to unit. (Display 3-4-1(g) shows up.)
Display 3-4-1(f)
Please eject Test Disc.

Display 3-4-1(g)
Please Insert Audio Test Disc.
  1. Put a headphone and insert Audio Test Disc (TGYS-1) to the unit under test. And playing audio starts. Then set volume so that it centers.
Display 3-4-1(h)
Does any sound play back? ([Y]/N)
  1. If any sound can be heard from the headphone, hit Y key to continue the test. If not, Audio circuit should defective and hit N key to escape from the Audio test.
  2. After Audio test, the result (OK or NG) of each test item on the Test Result Column will appear as below.
Display 3-4-1(i)
Play Audio                                XX (<-- Test Result Column)

  1. If the test using Audio Test Disc (TGYS-1) is completed, and Display 3-4-1(j) shows up.
Display 3-4-1(j)
Result OK

  1. Eject the Audio Test Disc (TGYS-1) to the unit.
Display 3-4-1(k)
Do you test another drive? (Y/[N])

3-4-3 Check Point

This section describes check points which come out in accordance with test procedure in 3-2-2.
Test ItemsCheck PointRemarks
Inquiry 1. SCSI ID No.Check if it has doubled SCSI ID No. on the same SCSI line.
2. SCSI Termination
3. Cable connection
4. Voltage OutputRefer to 5-3
5. OthersRefer to 3-5
Read Only Disc
   Request sense

1. ROM (Ref. no. IC 812)

Refer to 5-8
   Read capacity
   Mode sense/select
   TOC read
   Rezero
   Seek
   Read
1. DiscDifferent type of disc is set.
2. Voltage OutputRefer to 5-3
3. LD PowerRefer to 5-2-3
Dirty lens (Refer to 5-9)
4. Spindle motorRefer to 5-6
5. Sled operationVisually Check (Refer to 3-5-4)
6. Limit SW (Ref. no. S705 - Mech-Con PCB)
7. PWM AMPRefer to 5-5
8. OP Lens motionVisually Check (Refer to 3-5-12)
9. RF signalRefer to 5-2-8
10. Focus Servo Loop GainRefer to 5-2-7
11. Tracking error SignalRefer to 5-2-6
12. Tracking Servo Loop GainRefer to 5-2-7
13. Optical device SignalWaveform Check (Refer to 3-5-12)
14. Disc in/Disc Protection/ Reflection switch (Ref. no. S701/S702/S703) - Mech-Con PCB) Refer to 3-5-3
Re-Writable Disc
   Read capacity
   TOC read
   UTOC
   Rezero
   Seek
   Read

1. RF Signal

Refer to 5-2-8
2. Tracking Servo Loop GainRefer to 5-2-7
3. Optical device SignalWaveform check (Refer to 3-5-13)
   Write/Verify 1. LD Write PowerRefer to 5-2-3
2. Optical Device SignalWaveform check (Refer to 3-5-13)
3. APCREF, APCRefer to 5-2-3
4. StepperRefer to 3-5-17
5. Temperature DetectionRefer to 5-2-2
   Error rate 1. LD Write PowerRefer to 5-2-3
2. StepperRefer to 3-5-17
3. Focus Bias/RF JitterRefer to 5-3-8
4. Motor JitterRefer to 5-6
Audio Disc
   Audio Play

1. Audio Output

Refer to 5-7

3-5 FUNCTION CHECK (OTHER THAN AUDIO BLOCK)

The following flowchart 3-5 shows an example of a typical procedure to check a faulty unit and to identify defective part. Section No. is shown with each operation for the detailed procedure.

3-5-1 Pre-Setting

  1. Disassemble the following parts before connecting to the computer.
      Upper Panel, Rear/Bottom Panel Ass'y (Refer to 4-1) Ornamental Belt Ass'y (Refer to 4-2)
  2. Connect the unit to the host computer as shown in Fig. 2-3-2.
Note: After connecting the unit to be tested, load TEST program in accordance with section 5-2-1.

3-5-2 Status Check

  1. Execute 19: Drive Status and check whether the unit respond normally.
  2. Type s t s and push RETURN to see the drive status information continuously on top of the screen.
Note: In case of no response from the unit, MAM Mounted Board is faulty.


3-5-3 Disc ID Switches

  1. Insert a Read Only Disc (TGYS-9001) into the drive.
  2. Check the drive status by 19: Drive Status command or by indications on the status bar on top of the screen. Table below shows the normal status condition.
  3. Eject a Read Only Disc (TGYS-9001). Then insert a Re-Writable Adj. Disc with the disc protection closed (writable). Check the Status.
  4. Eject the disc from unit.
Note: If the status indication is wrong, switches on Mech-Con Mounted Board are faulty.
Status BarDrive Status 2
XDSCINDSCPRTRFLCTbit 7bit 6bit 5
No discononon100
Read-Onlyoffonoff101
Re-writableoffoff*on0*10
* : Inverted if the disc is write protected.
Note: Never change the disc write protection while disc is in the unit. It will break the detection switch.

3-5-4 Sled Motor Check

  1. Execute 16: Step Out command after setting parameter to 100 in parameter window. Check the Optical device moves to the other position.
  2. Execute 15: Step in after setting parameter to 100 in parameter window. Check the Optical Device motion whether it is returned to the original position.
Note: If the Optical Device will not move, the Sled Motor or the driver IC (PWM AMP) faulty.

3-5-5 Focusing

  1. Check this procedure with both types of the disc by turns. Insert one of the discs. Move the Optical Device out by 100 steps with the 16: Step Out command.
  2. Execute 13: Focus ON/OFF command after setting Byte 05 to 01 (01 means Focus on) in parameter window. The unit will spin the disc and try focus search and close the servo. Check whether the focus servo is on by the FOK indication (ON) in the status bar on top of the screen, or by 19: Drive Status command with the Drive Status 1, bit 6 Focus (=1).
Note: If failed to focus, the Spindle Motor, the 2 axis actuator on the Optical Device, the driver (PWM amp.), the Focus offset and gain adjustment or the MAM mounted board is faulty.

3-5-6 Tracking

  1. After the Focus servo is on, execute 12: Tracking ON/OFF after setting Byte 05 to 01 (01 means Tracking on) in parameter window. The unit will close the Tracking servo. Check it by the LOCK indication (ON) in the status bar on top of the screen, or by 19: Drive Status command with the Drive Status 1, bit 7 Tracking (=1) and 5 PLL (=1).
Note: If failed, the 2 axis actuator on the Optical device, the driver IC (PWM amp.), the Tracking offset and EF balance adjustment, gain adjustment, or the MAM mounted board is faulty.

3-5-7 Spin Up

  1. Execute 3: STOP if Focusing or Tracking is on. Spin up the unit by executing 2: Spin Up command. The unit will start spinning the disc, focusing, tracking and CLV control by turns. The FOK and the LOCK indication in the status bar on top of the screen will come on. If the disc is a Read Only Disc (TGYS-9001) or a Re-Writable Adj. Disc with normal data written, the GFS indication on the screen is also on.
Note: In case of failure, check the Return Code in byte 2 of the Return DATA on the screen. (Refer to Quick Reference Manual on page 5-4). Try Focusing (Refer to 3-5-5), Tracking (Refer to 3-5-6) and CLV ON (Refer to 3-5-14) by turns. The problem may exist in the Optical Device, the RF signal process circuit on the MAM mounted board or in the Spindle Motor jitters.

3-5-8 Seek

  1. Execute 5: Seek command to seek to any address. Check whether the drive can seek to near and far address, go outer and inner address. The cluster address range must be within the Read Out Start Address written in TOC (2252 clusters for any Re-Writable disc). Check the present address in the status bar on the screen.
Note: If failed, check the Optical device, Focus / Tracking offset and gain adjustment.

3-5-9 Read Cluster

  1. Be sure the disc in the unit contains normal data written at a known address range.
  2. After spinning up or seeking, execute 6: Read Cluster command at the address with any data written. Check byte 2 Return code in the Return DATA on the screen. (Refer to Quick Reference Manual on page 5-4). Return code 00 means success. Any other code indicate failure. Refer to the Return code table for the reason.

3-5-10 Read TOC / UTOC

  1. Be sure the UTOC is written on the Re-Writable Adj. Disc in the drive. If not, format the disc.
  2. After spinning up or seeking, execute 7: Read TOC command. The drive will seek to the Read-In area and read one TOC. Check byte 2 Return code in the Return DATA on the screen.
  3. Execute 8: Read UTOC command. (Refer to Quick Reference Manual on page 5-4). Check the Return code.
Note: In case of failure, check the Pit/Grv. signal on MAM mounted board and sled motion at the inner most radius position.

3-5-11 Write Cluster

  1. Be sure the disc in the unit is re-writable and is not write protected. (note: Never change the disc write protection while disc is in the unit. It will break a detection switch.) Recommend not using the standard test disc because the reference data written on the disc is destroyed in case of failure.
  2. After spinning up or seeking, execute 9: Write Cluster command at any address between cluster 100 and the Read-Out Area start address. The address less than cluster 99 is normally used for the UTOC and the alternation clusters for defective area. Check byte 2 Return code in the Return DATA on the screen. (Refer to Quick Reference Manual on page 5-4).
  3. Execute 6: Read Cluster command at the same address to verify the previous write operation. Check the Return code to be 00. (Refer to Quick Reference Manual on page 5-4).
Note: If failed to write a cluster, check Laser Power, EFMO signal, OWH and its driver IC.

3-5-12 2 Axis Actuator

  1. Eject a disc if it is in the unit. Look into the drive and find the objective lens on the Optical device. Execute 20: Reset Command.
  2. Put w&fffc7,fd on cmd [xx] > line. (This will reset the power save mode.)
  3. Put w80006,34 on cmd [xx] > line. (This will set focus search height.)
  4. Put w80006,03 on cmd [xx] > line. Check the lens is moved up.
  5. Put w80006,02 on cmd [xx] > line. Check the lens is moved down.
  6. Put w80006,00 on cmd [xx] > line to stop the focus control.
  7. Put w80006,28 on cmd [xx] > line. Check the lens is moved toward inner direction.
  8. Put w80006,2c on cmd [xx] > line. Check the lens is moved toward outer direction.
  9. Put w80006,20 on cmd [xx] > line to stop the tracking control.
Note: If the lens will not be moved, check conductivity of the 2 axis actuator coils. (TP104 [F-] and TP101 [F+], TP103 [T+] and TP102 [T-]) The both coil resistance are 7.0 ± 1.0 Ω. If the coils are normal, check the PWM amplifier (Refer to 5-5).

Hinge Bend Check

  1. Remove the MAM Mounted Board. (Refer to section 4)
  2. Visually check the Optical Device hinge from the bottom. Check the position of the lens holder (black mold part holding the lens and coils) relative to a prism mirror (matted glass part).
Note: If the hinge is bent, the Optical device has to be replaced.

3-5-13 Optical Device Signals

  1. Focusing (S-shaped Signal)
    a-1.
    Connect a probe of an oscilloscope (storage type recommended) to AP5070 [FE-O}. Set trigger DC coupling with 2.0V level, positive and normal.
    a-2.
    Insert a Re-Writable Adj. Disc. Move the Optical Device out by 100 steps with the 16: Step Out command.
    a-3.
    Execute 13: Focus ON/OFF command after setting Byte 05 to 01 (01 means Focus on) in parameter window. The unit will spin the disc and try focus search and close the servo. Check whether the focus servo is on by the FOK indication (ON) in the status bar on the screen, or by 19: Drive Status command with the Drive Status 1, bit 6 Focus (=1).
    a-4.
    Put w80006,00 on cmd [xx] > line to stop the focus control.
    a-5.
    Put w : fffd6,01 on cmd [xx] > line to set AGCTC (Auto Gain Control Time COnstant) short.
    a-6.
    Put w80006,03 on cmd [xx] > line to move the Optical Device lens up. The oscilloscope may be triggered by a signal when the focal point cross the surface of the disc.
    a-7.
    Put w80006,02 on cmd [xx] > line to move the Optical Device lens down. The oscilloscope is triggered by the S-shaped signal.
    a-8.
    Repeat item a-6. and a-7. for adjusting the oscilloscope setting to capture clear signal. Two S-shaped signals may be observed, one at the disc top surface and the other at the bottom. The first one is the true S-shaped signal.
    Peak to peak voltage level of the S-shaped signal should be more than 2 Vp-p. If low, the Optical device is faulty.
    a-9.
    Execute 3: Stop command before proceeding to other function check.
  2. Tracking (Traverse Signal)
    b-1.
    Connect a probe of an oscilloscope to AP5060 [TE-O].
    b-2.
    Insert a Re-Writable Adj. Disc. Move the Optical Device out by 100 steps with the 16: Step Out command.
    b-3.
    Execute 13: Focus ON/OFF command after setting Byte 05 to 01 (01 means Focus on) in parameter window.
    b-4.
    The oscilloscope shows the traverse signal; the tracking error signal while crossing over many tracks due to eccentricity of the disc (Refer to 5-2-5). The peak to peak voltage level of the traverse signal should be more than 1.5 Vp-p. If low, the Optical device is faulty. Try replacing the Optical Device with new one and check the level again after adjustment in section 5. If the level is still low, position alignment of the Spindle Motor is out of tolerance and the Mech. Deck has to be replaced. Spindle motor position is aligned only at factory with a dedicated facility.
  3. RF and EFM (Read Data Signal)
    c-1.
    Connect a probe of a non-storage oscilloscope to AP5020 [RF].
    c-2.
    Insert a Read Only Disc (TGYS-9001) or a Re-Writable Adj. Disc with normal data written.
    c-3.
    Execute 5: Seek with appropriate cluster address (50 for the standard test disc).
    c-4.
    Normal eye-pattern (RF Signal) should be observed (Refer to 5-2-7 display). Probe at AP5090 [EFM]. The EFM signal is the digital read data into binary levels. The eye-pattern is not observed if no data is written in the area being read.
    c-5.
    If peak to peak voltage level of the RF signal is less than 0.5Vp-p, the Optical device or the APC (Auto Power Control) circuit on MAM mounted board is faulty.
    c-6.
    If low frequency jitters; shrinkage and expansion of the eye-pattern in time axis, is observed, spindle motor or its control is faulty. Check the motor jitters in 5-2-9.
    c-7.
    If high frequency noise or high frequency jitters (blurred line) is observed, 3.5-2V power line or the Optical device is faulty. Check voltage and noise on 3.5-2V line.
  4. ADIP (Push-Pull or Wobble Signal)
    d-1.
    Connect a probe of an oscilloscope to AP5122 [ADIPFM].
    d-2.
    Insert a Re-Writable Adj. Disc.
    d-3.
    Execute 5: Seek with appropriate cluster address (50 for the standard test disc).
    d-4.
    24.8khz sinusoidal waveform is observed. Because the signal is modulated with address data in FM, the modulation jitters are included. Peak to peak voltage level of the signal is around 0.4 Vp-p, but the amplitude varies due to influence from adjacent tracks. If the level is less than 0.2 Vp-p, the Optical Device is faulty.

3-5-14 CLV Control

  1. Follow the procedure in 3-5-5 and 3-5-6 to start focusing and tracking.
  2. Execute 21: CLV On/Off command after setting Byte 05 to 01 (means CLV control on). Check the LOCK indicator is on in the status bar on the screen or the PLL bit (bit 5) in the Drive Status 1 is 1 (high).
Note: If not, check RF signal and ADIP signal (Refer to 3-5-13).

3-5-15 Disc Type and Tracking Mode Selection

  1. Insert a Re-Writable Adj. Disc. Move the Optical Device out by 100 steps with the 16: Step Out command.
  2. Execute 13: Focus ON/OFF command after setting Byte 05 to 01 (01 means Focus on) in parameter window.
  3. Check both RFSW1 and RFSW0 are 0 (low) by the indication in the status bar on the screen or bit 0 and 1 in the Drive Status 2. The unit is in the low reflectivity (Re-Writable Adj.) disc and the groove mode.
  4. Execute 20 : Reset command move the Optical Device to the TOC area or the inner most position.
  5. Check focus is still on by the FOK indication in the status bar. If not execute 13: Focus ON/OFF command after setting Byte 05 to 01.
  6. Check RFSW1 is 1 (high) and RFSW0 is 0 (low). The unit is in the low reflectivity (Re-Writable Adj.) disc and the pit mode.
  7. Eject the Re-Writable Adj. Disc and insert a Read Only Disc (TGYS-9001).
  8. Execute 13: Focus ON/OFF command after setting Byte 05 to 01.
  9. Check both RFSW1 and RFSW0 are 1 (high). The unit is in the high reflectivity (Read Only) disc and the pit mode.
Note: If the unit mode is incorrect, the pit/grv detection circuit in the MAM mounted board is faulty.
RFSW1 RFSW0
Read-Only disc Pit 1 (high) 1 (high)
Re-writable disc Pit 1 (high) 0 (low)
Re-writable disc Groove 0 (low) 0 (low)

3-5-16 Write Signal

  1. Insert a Re-Writable Adj. Disc which is not write protected. (note: Never change the disc write protection while disc is in the unit. It will break a detection switch.) Recommend not using the standard test disc because the reference data written on the disc is destroyed in case of failure.
  2. After spinning up or seeking, execute 9: Write Cluster command from cluster 100 for 255 clusters long. The write operation will continue for about 109 seconds.
  3. Probe the RECEFM signal with a non-storage oscilloscope at TP8203. The waveform should be similar to that of the EFM signal in section 3-5-13 item c. If not, IC701 EFM Enc/Dec. on MAM mounted board is faulty.
  4. Check the OWH drive signal according to the procedure in section 5-3. If wave form is not normal, check conductance of the magnetic head. The resistance is 1.7 ± 0.3 Ω.

3-5-17 Stepper Motor

  1. The stepper motor is used to lock the eject mechanism during read or write operation, also to move the OWH down/up.
  2. Execute 9: Write Cluster command. Visually check the OWH is moved down on the surface of the disc before write operation starts, and is moved up at the end.
Note: If failed, check stepper motor and its drive IC.