Table of Contents
Next page
Previous page

Playing Tracks Repeatedly
You can play tracks repeatedly in any play mode.
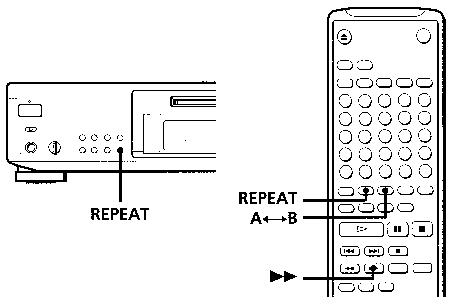
Press REPEAT.
"REPEAT" appears in the display. The deck repeats the tracks as follows:
When the MD is
played in |
The deck repeats |
| Normal play (page 11) |
All the tracks |
| Shuffle Play (page 23) |
All the tracks in random order |
| Program Play (page 23) |
The same program |
To cancel repeat play
Press REPEAT several times until "REPEAT" disappears. The deck returns to the original playing mode.
Repeating the current track
While the track you want to repeat is playing in normal play, press REPEAT several times until
"REPEAT 1" appears in the display.
Repeating a specific portion (A-B Repeat)
You can play a specific portion of a track repeatedly. This might be useful when you want to memorize lyrics. Note that you can only repeat a portion within the
boundaries of a single track.
- While playing a disc, press A<>B at the starting point (point A) of the portion to be played repeatedly. "REPEAT A-" flashes in the display.
- Continue playing the track or press
 . until you reach the ending point (point B), then press A<>B again. "REPEAT A-B" lights continuously. The deck starts to play the specified portion repeatedly,
To cancel A-B Repeat
Press REPEAT or  .
.
Setting new starting and ending points
You can repeat the portion immediately after the currently specified portion by changing the starting and ending points.
- Press A<> while "REPEAT A-B" appears. The current ending point B becomes the new starting point A and "REPEAT A-" flashes in the display.
- Continue playing the track or press until you reach the new ending point (point B), then press A<>B again. "REPEAT A-B" lights continuously and the deck starts playing repeatedly the newly specified portion.
Note
If you turn off the deck or disconnect the AC power cord, the deck will recall the last setting of the Repeat Function the next time you turn on the deck. The A-B Repeat settings, however, are lost.
Playing in Random Order (Shuff le Play)
You can have the deck "shuffle" tracks and play them in random order.
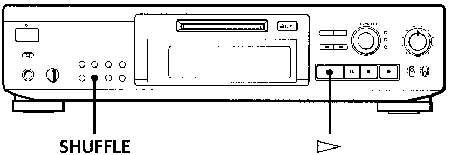
- Press SHUFFLE when the deck is stopped.
- Press
 to start Shuffle Play.
 appears in the display while the deck is "shuffling" the tracks.
To cancel Shuffle Play
Press CONTINUE when the deck is stopped.
 You can specify tracks during Shuffle Play
- To play the next track, turn AMS clockwise (or press

- To play from the beginning of the current track again, turn AMS counterclockwise (or press
 ). You cannot use AMS (or ) to go to tracks that have already been played.
Creating Your Own Program (Program Play)
You can specify the playback order of the tracks on an MD and create your own programs containing up to 25 tracks.
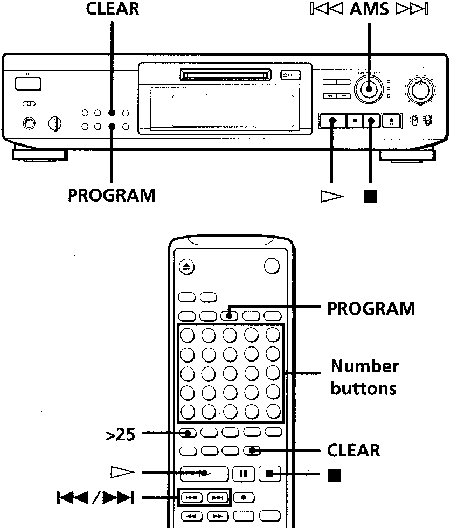
- Press PROGRAM when the deck is stopped.
- Do either a) or b):
- When using the remote
Press the number buttons to enter the tracks you want to program in the order you want. To program a track with a number over 25, use the >25 button (see page 21).
- When using the controls on the deck
- Turn AMS until the track number you want appears in the display.
- Press AMS or PROGRAM.
If you've made a mistake
Press CLEAR, then program the right track.
- Repeat Step 2 to enter other tracks. Each time you enter a track, the total program time is added up and appears in the display.
- Press to start Program Play.
To cancel Program Play
Press CONTINUE when the deck is stopped.
You can program the same track repeatedly
While the track number appears in the display, press AMS as many times as you want.
The program remains even after Program Play ends
When you press , you can play the same program again.
Notes
- The program created by the Program Play Function is lost when you turn off the deck or disconnect the AC power cord. The program is, however, recalled during tirner playback.
- The display shows "- -m - -s' instead of the total playing time when the total playing time of the program exceeds 160 minutes.
Checking the track order
You can check the order of tracks in your program during playback or playback pause.
Turn AMS (or press or ) during playback or
playback pause. The track numbers appear in the order they were programmed.
Changing the track order
You can change the order of the tracks in your program before you start playing.
| To |
Do the following |
Erase the last track in the
program |
Press CLEAR. Each time you
press the button, the last track
will be cleared. |
Add tracks to the end of the
program |
Do Steps 2 and 3 in "Creating
Your Own Program". |
Change the whole program
completely |
- Press while the deck is stopped.
- Do Steps 2 and 3 in "Creating
Your Own Program". |
Useful Tips when Recording from MDs to Tape
The Auto Space and Auto Pause Functions described in this section make recording from MDs to tape more easy.
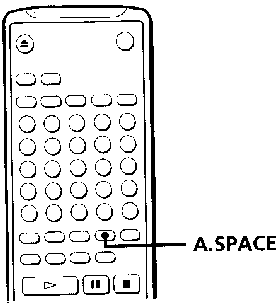
Inserting blank spaces while recording to tape (Auto Space)
The Auto Space Function inserts a 3-second blank space between each track while recording from MDs to tapes, allowing you to use the AMS function during later playback.
Press A.SPACE repeatedly until "A.SPACE" appears in the display.
To cancel Auto Space
Press A.SPACE repeatedly until "A.SPACE" disappears.
Note
If the Auto Space Function is on while recording a selection containing multiple track numbers, (for example, a medley or symphony), blank spaces will be inserted within the selection whenever the track number changes.
Pausing after each track (Auto Pause)
When the Auto Pause Function is on, the deck pauses after playing each track. Auto Pause is convenient when recording single tracks or multiple, non-consecutive tracks.
Press A.SPACE repeatedly until "A.PAUSE" appears in the display.
To restart playback
Press or  .
.
To cancel Auto Pause
Press A.SPACE repeatedly until "A.PAUSE" disappears.
Note
If you turn off the deck or disconnect the AC power cord, the deck will recall the last setting of the Auto Space and Auto Pause Functions the next time you turn on the deck.
Playing an MD Using a Timer
By connecting a timer (not supplied) to the deck, you can start and stop playback operations at specified times. For further information on connecting the timer or setting the starting and ending times, refer to the instructions that came with the timer.
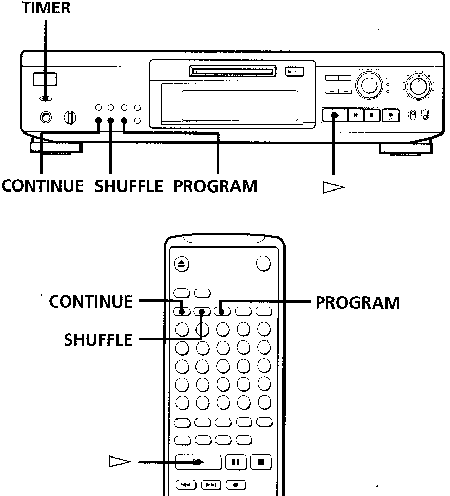
- Do Steps 1 to 3 in "Playing an MD" on page 11.
- Press CONTINUE, SHUFFLE or PROGRAM to select the play mode you want. To play only specific tracks, create a program (see page 23).
- If you want to specify the time for the start of playback, go to Step 4.
- If you want to specify the time for the end of playback, press to start playback, then go to Step 4.
- If you want to specify the time for both start and end of playback, go to Step 4.
- Set TIMER on the deck to PLAY.
- Set the timer as required.
- When you have set the time for the start of playback, the deck turns off. When the specified time arrives, the deck turns on and starts playing.
- When you have set the time for the end of playback, playback continues. When the specified time arrives, the deck stops playing and turns off. When you have set the time for both the start and end of playback, the deck turns off.
- When the starting time arrives, the deck turns on and starts playing. When the ending time arrives, the deck stops playing and turns off.
- After you have finished using the timer, set TIMER on the deck to OFF.
Note
You can select Program Play in Step 2. Note, however, that programs eventually fade away when the standby status is off, and therefore if you set the time too far in the future, the program may be gone when the specified time arrives. If this has occurred, the deck enters normal play mode at the
specified time and the tracks play in consecutive order.
Table of Contents
Next page
Previous page
HTML-ized by Mario Zlatovic