Table of Contents
Next page
Previous page

Recording Over Existing Tracks
Follow the procedure below to record over existing material just as you would on an analog cassette tape.
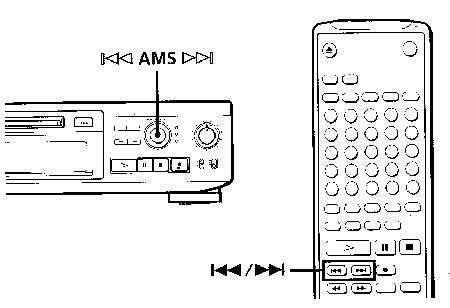
- Do Steps 1 to 5 in "Recording on an MD" on page 9.
- Turn AMS (or press
 or
or  ) until the number of the track to be recorded over appears.
- To record from the start of the track, continue from Step 6 in "Recording on an MD" on page 10.
 While "TRACK" flashes in the display
The deck is recording over an existing track, and stops flashing when it reaches the end of the recorded portion.
 To record from the middle of the track
- After Step 2 above, press
 to start playback.
- Press
 where you want to start recording.
- Continue from Step 6 in "Recording on an MD" on page 10.
Note
You cannot record from the middle of an existing track when the "PROGRAM" or "SHUFFLE" is on.

Adjusting the Recording Level
When recording with INPUT at ANALOG and the signal input through LINE (ANALOG) IN jacks, use REC LEVEL to adjust the recording level before starting recording.
You cannot adjust the recording level during digital recording.
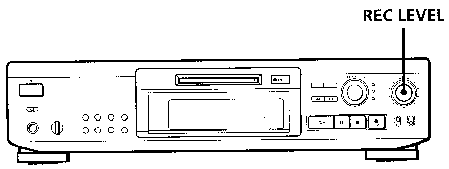
- Do Steps 1 to 6 in "Recording on an MD" on pages 9 and 10.
- Play the portion- of the program source with the strongest signal level.
- While monitoring the sound, turn REC LEVEL to adjust the recording level so that the peak level meters reach their highest point without turning on the OVER indication. Occasional lighting of "OVER" is acceptable.

- Stop playing the program source.
- To start recording, do the procedure starting from Step 8 in "Recording on an MD" on page 10.

Marking Track Numbers while Recording (Track Marking)
You can mark track numbers either manually or automatically. By marking track numbers at specific points, you can quickly locate the points later using the, AMS Function or Editing Functions.
Marking track numbers manually
(Manual Track Marking)
You can mark track numbers at any time while recording on an MD.
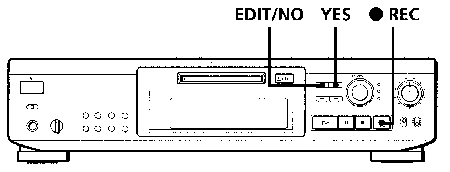
Press  REC at the place you want to add a track mark while recording.
Marking track numbers automatically
(Automatic Track Marking)
The deck adds track marks differently in the following cases:
- When recording from CDs or MDs with INPUT at digital input and the source connected through the respective digital input connector:
The deck marks track numbers automatically. When you record from a CD or MD, the track numbers are marked as they are found on the original.
- When recording with INPUT at ANALOG and the source connected through LINE (ANALOG) IN, or when recording from DAT or satellite broadcasts with INPUT at digital input and the DAT or satellite broadcasts connected through the respective digital input connector:
The deck marks a new track number whenever the signal level drops and rises to a certain point* (Automatic Track Marking). If "LEVEL-SYNC' does not light up, set the LevelSync to ON as follows:
- Press EDIT/NO to display "LevelSync ?"during recording or recording pause.
- Press YES twice to display "LevelSync ON.""LEVEL-SYNC" appears in the display.
To cancel Automatic Track Marking
- Press EDIT/NO during recording or recording pause. "LevelSync ?" appears in the display.
- Press YES.
- Press EDIT/NO. "LevelSyncOFF" appears in the display.
*The signal level must remain low for 2 or more seconds before a new track number is marked.
 When you want to mark track numbers after you've finished recording
Use the Divide Function (see "Dividing Recorded Tracks" on page 28).
Note
If you turn off the deck or disconnect the AC power cord, the deck will recall the last setting (LevelSync on or off) of the Automatic Track Marking Function the next time you turn on the deck.

Starting Recording with 2 Seconds of Prestored Audio Data
(Time Machine Recording)
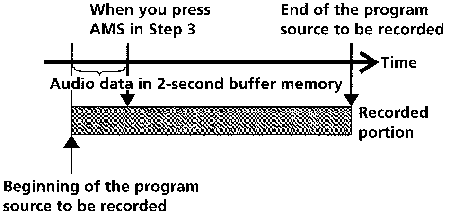
When recording from an FM or satellite broadcast, the first few seconds of material are often lost due to the time it takes you to ascertain the contents and press the record button. To prevent the loss of this material, the Time Machine Recording Function constantly stores 2 seconds of the most recent audio data in a buffer memory so that when you begin recording the program source, the recording actually begins with the 2 seconds of audio data stored in the buffer memory in advance, as shown in the illustration below:
- Do Steps 1 to 6 in "Recording on an MD" on pages 9 and 10.
The deck changes to recording pause.
- Start playing the program source you want to record.
The most recent 2 seconds of audio data is stored in the buffer memory.
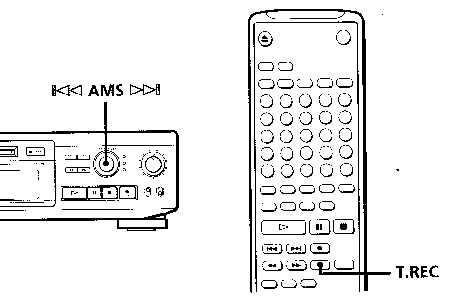
- Press AMS (or T.REC) to start Time Machine Recording.
Recording of the program source starts with the 2 seconds of audio data stored in the buffer memory.
 To stop Time Machine Recording
Press 
Note
The deck starts storing audio data when the deck is in recording pause and you start playing the program source. With less than 2 seconds of playing of the program source and audio data stored in the buffer memory, Time Machine Recording starts with less than 2 seconds of audio data.

Synchro-Recording with
Audio Equipment of Your Choice
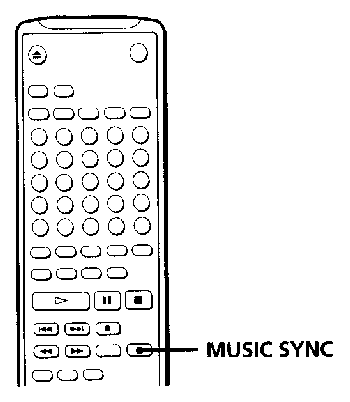
By using the MUSIC SYNC button on the remote, you can automatically start recording in sync with the signal input from the program source through the LINE (ANALOG) IN jacks or the respective digital input connector (Music Synchro-Recording). The method of marking track numbers differs, depending on the program source being recorded and how the deck is connected to the program source. (See "Notes on Recording" on page 12.)
- Do Steps 1 to 5 in "Recording on an MD" on page 9.
- Press MUSIC SYNC.
The deck changes to recording pause.
- Start playing the program source you want to record.
The deck starts recording automatically.
 To stop Music Synchro-Recording
Press  .
.
Note
When Music Synchro-Recording, the Smart Space Function and the Auto Cut Function turn on automatically regardless of their setting (on or off) and type of input (digital or analog).

Synchro-Recording with a Sony CD Player
By connecting your deck to a Sony CD player or Hi-Fi Component System, you can easily dub CDs onto MDs using the CD synchro buttons on the remote. If your deck is connected to a Sony CD player by a digital input cable, track numbers are automatically marked as appear on the original regardless of whether "LevelSync ON" or "LevelSyncOFF" is selected. If your deck is connected to a Sony CD player by audio connecting cords through LINE (ANALOG) IN, track numbers are automatically marked when you select "LevelSync ON" (see "Marking Track Numbers while Recording" on page 15).
As the same remote controls both the CD player and the deck, you may have trouble operating both units if they are far from each other. If you do, place the CD player close to this deck.
- Set the source selector on the amplifier to CD.
- Do Steps 2 to 5 in "Recording on an MD" on page 9 to prepare the deck for recording.
- Insert a CD into the CD player.
- Select the playback mode (Shuffle Play, Program Play, etc.) on the CD player.
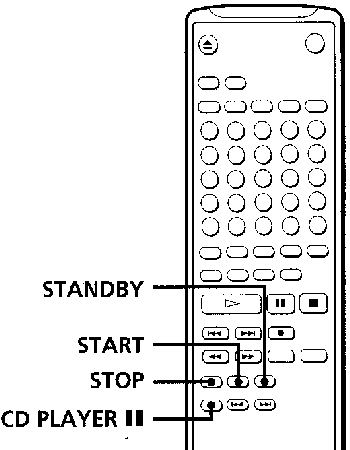
- Press STANDBY. The CD player pauses for playing and the deck pauses for recording.
- Press START.
The deck starts recording and the CD player starts playback. The track number and elapsed recording time of the track appear in the display.
If the CD player does not start playing
Some CD player models may not respond when you press START on the remote of the deck. Press  on the remote of the CD player instead.
- Press STOP to stop synchro~recording.
To pause recording
Press STANDBY or CD PLAYER  .
.
To restart recording, press START or CD PLAYER  . A new track number is marked each time you pause recording.
Note
When synchro-recording, set the mode selector of the remote of the CD player to CD1.
 You can use the remote of the CD player during synchro-recording
When you press  , the CD player stops and the deck pauses for recording.
When you press  , the CD player pauses and the deck pauses for recording.
To restart synchro-recording, press  .
.
 You can change CDs during synchro-recording
Do the following steps instead of Step 7 above.
- Press
 on the remote of the CD player. The deck pauses for recording.
- Change the CD.
- Press
 on the remote of the CD player. Synchro-recording restarts.
 You can also do synchro-recording with a Sony video CD player
Using the procedure for synchro-recording with a Sony CD player, you can do synchro-recording with a Sony video CD player also. To select the video CD player, press button number 2 while pressing down the POWER button before starting the procedure. To select the CD player again, press button number 1 while pressing down the POWER button. The deck is factory set to a CD player for synchro-recording.
 You can check the remaining recordable time on the MD
Press DISPLAY (see page 19).
 You can automatically copy CD track names to the MD during synchro-recording (Track Name Copy)
By connecting the deck to a Sony CD player through the CONTROL Al jack, you can use the Track Name Copy Function if a CD to be synchro-recorded has CD text or track memo information. When the track number is marked during synchro- recording, the track name (CD text or track memo) is automatically copied to the MD, and the copied name scrolls in the display. Note that you cannot use the Track Name Copy Function in the following cases:
| When |
Message: |
| the CD has no track names |
"NO NAME" |
the text information is copy-
protected |
"TEXT PROTECT" |
the titling capacity of the MD
has reached its limit |
"NAME FULL" |
Notes
- The Track Name Copy Function basically copies the CD text information, but if there is no text information, it copies the track memos.
- You cannot use the Track Name Copy Function while you are recording over an existing track.

Recording on an MD Using a Timer
By connecting a timer (not supplied) to the deck, you can start and stop recording operations at specified times. For further information on connecting the timer and setting the starting and ending times, refer to the instructions that came with the timer.
- Do Steps 1 to 7 in "Recording on an MD" on pages 9 and 10.
- If you want to specify the time for the start of recording, press
 .
.
- If you want to specify the time for the end of recording, do Steps 8 and 9 of "Recording on an MD" on page 10.
- If you want to specify the time for both start and end of recording, press
 .
.
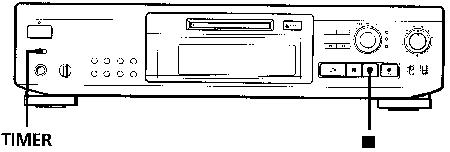
- Set TIMER on the deck to REC.
- Set the timer as required.
- When you have set the time for the start of recording, the deck turns off. When the specified time arrives, the deck turns on and starts recording.
- When you have set the time for the end of recording, recording continues. When the specified time arrives, the deck stops recording and turns off.
- When you have set the time for both the start and end of recording, the deck turns off. When the starting time arrives, the deck turns on and starts recording. When the ending time arrives, the deck stops recording and turns off.
- After you have finished using the timer, set TIMER on the deck to OFF. Then place the deck in standby status by plugging the AC power cord of the deck into a wall outlet or set the timer to continuous operation.
- If TIMER is left at REC, the deck will automatically start recording the next time you turn the deck on.
- If you do not change the deck to standby status for more than a month after timer recording has finished, the recorded contents may disappear.
Make sure to change the deck to standby status within a month after timer recording is completed
The TOC on the MD is updated and recorded contents are written to the MD when you turn the deck on. If the recorded contents have disappeared, "STANDBY" flashes when you turn the deck on.
Notes
- During timer recording, new material is recorded from the end of the recorded portion on the MD.
- Material recorded during timer recording will be saved to the disc the next time you turn the deck on. "TOC" will flash in the display at that time. Do not move the deck or pull out the AC power cord while "TOC" is flashing.
- Timer recording will stop if the disc becomes full.

Table of Contents
Next page
Previous page
HTML-ized by Mario Zlatovic
![]()

![]()


![]()

![]() REC at the place you want to add a track mark while recording.
REC at the place you want to add a track mark while recording.![]() When you want to mark track numbers after you've finished recording
When you want to mark track numbers after you've finished recording![]()


![]()


![]()


![]() You can use the remote of the CD player during synchro-recording
You can use the remote of the CD player during synchro-recording![]() , the CD player stops and the deck pauses for recording.
, the CD player stops and the deck pauses for recording.![]() , the CD player pauses and the deck pauses for recording.
, the CD player pauses and the deck pauses for recording.![]() .
.![]() You can change CDs during synchro-recording
You can change CDs during synchro-recording![]() You can check the remaining recordable time on the MD
You can check the remaining recordable time on the MD![]() You can automatically copy CD track names to the MD during synchro-recording (Track Name Copy)
You can automatically copy CD track names to the MD during synchro-recording (Track Name Copy)![]()

![]()